
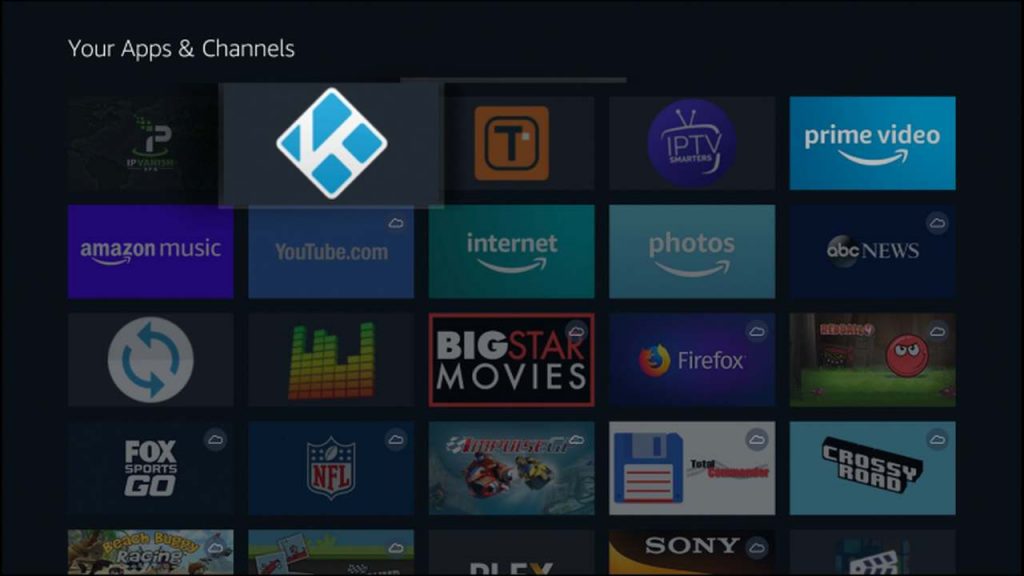
How to Install Kodi on Firestick without PC
Have you tried Kodi on your FireStick? Well, you should. The device is highly responsive and has a remote control that works great with Kodi as well. While downloading, installing, and setting up Kodi on a FireStick is not as straightforward as other Kodi-compatible devices, it is still doable. Don’t worry, that’s why I’m here. Let me guide you through how to install Kodi on your FireStick and use a VPN to get various impressive add-ons on it.

How to Install Kodi on Firestick Update and Download
Content Index
Kodi is a great way to enjoy a wide selection of incredible add-ons. That includes streaming channels from all around the world. But if you own a FireStick, you’ll find it a bit daunting to get the actual Kodi app on the device. Luckily, there’s a couple of workarounds you can follow to achieve that. Let’s take a look.
Setting Up Kodi on FireStick using ES Explorer
The Kodi 17 FireStick download and install process includes two main steps. The first thing to do is to install the ES File Explorer. Without this application, Kodi won’t be available for installation. If you have already setup ES File Explorer on your Fire TV, you can skip step 1 and directly start with step 2.
1st Step: Get File Explorer on FireStick
Alright, so if you don’t have the File Explorer app ready to be used, let’s kick off with getting it on your Fire Stick. This won’t take much time, 4 to 5 minutes give or take. Here we go:
- Turn on your FireStick and head over to Settings.
- There you can access its “Developer Options”.
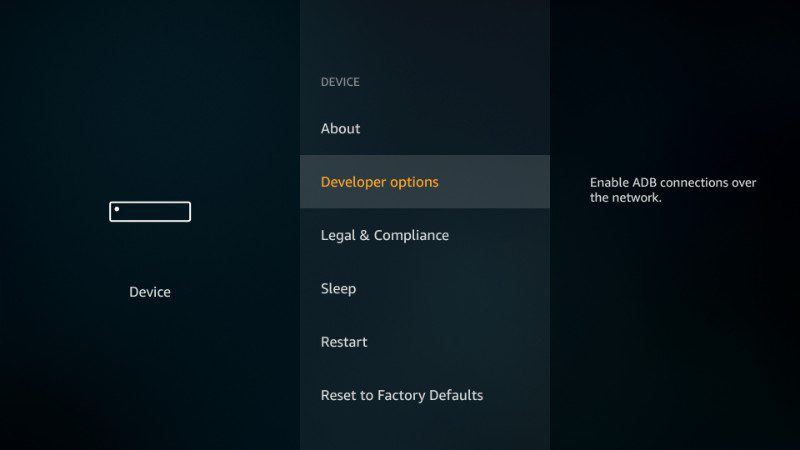
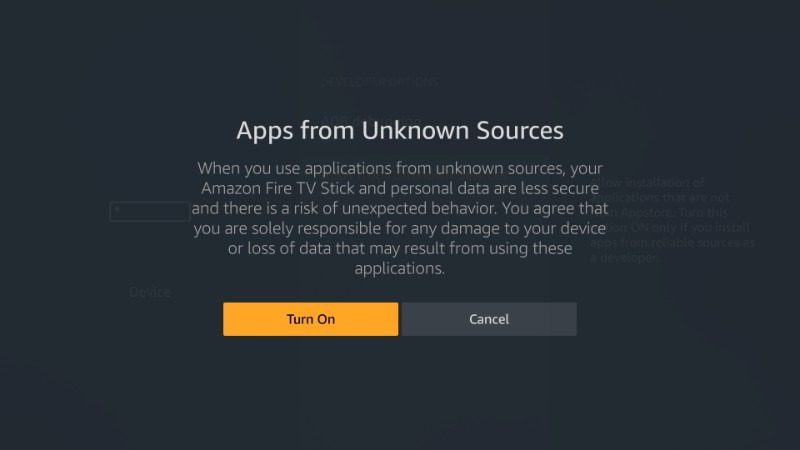
- “Allow Apps from Unkown Sources” is what you’re looking for.
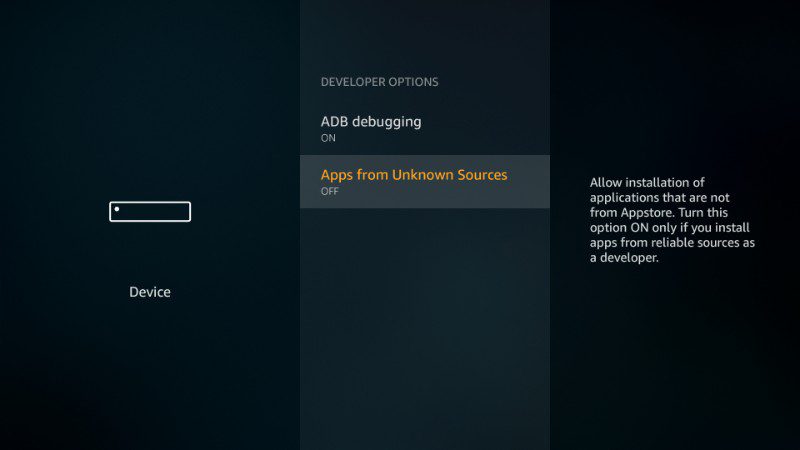
- Turn the option on.
- Use your FireStick’s search option to look for ES File Explorer.

- Choose your application and hit Download.
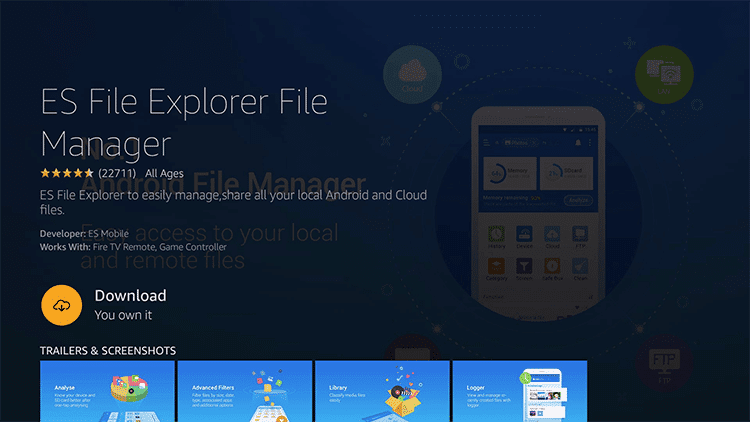
- You now have ES File Explorer on FireStick. Step 1, check.
Step 2: Install Kodi on FireStick via ES Explorer
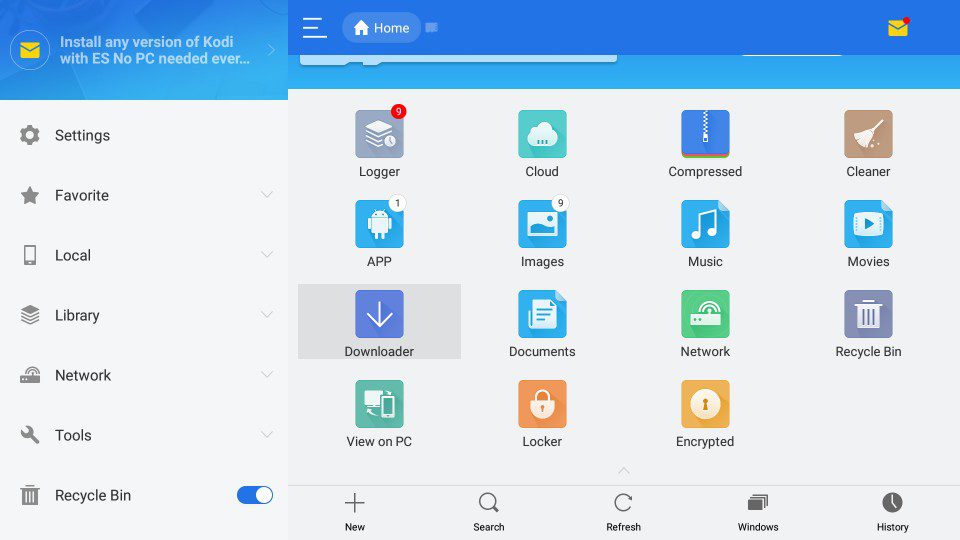
With ES File Explorer, you get to download a wide selection of unavailable applications. However, our main focus today is Kodi. Here’s how you get it:
- From the ES File Explorer app, select Downloader.
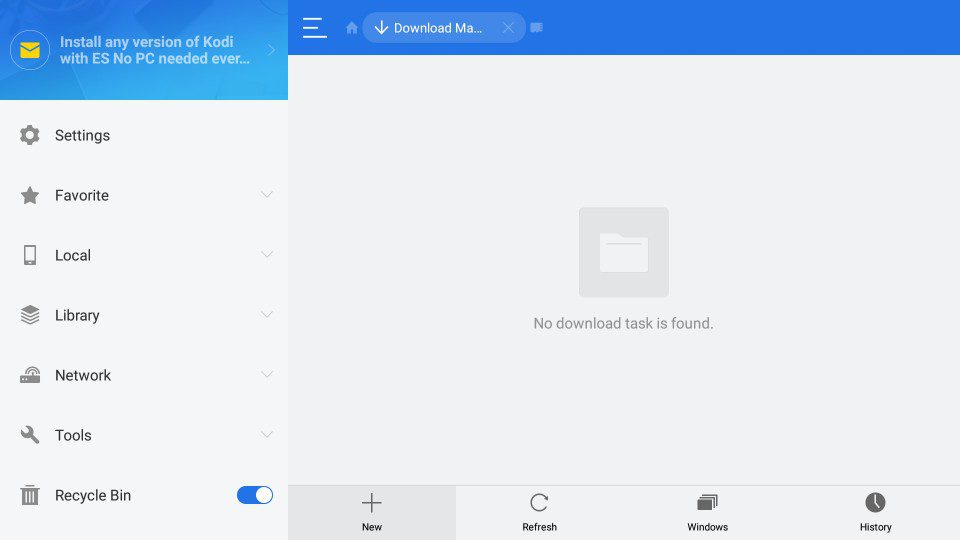
- Now, do you see the +New sign? Click on that.
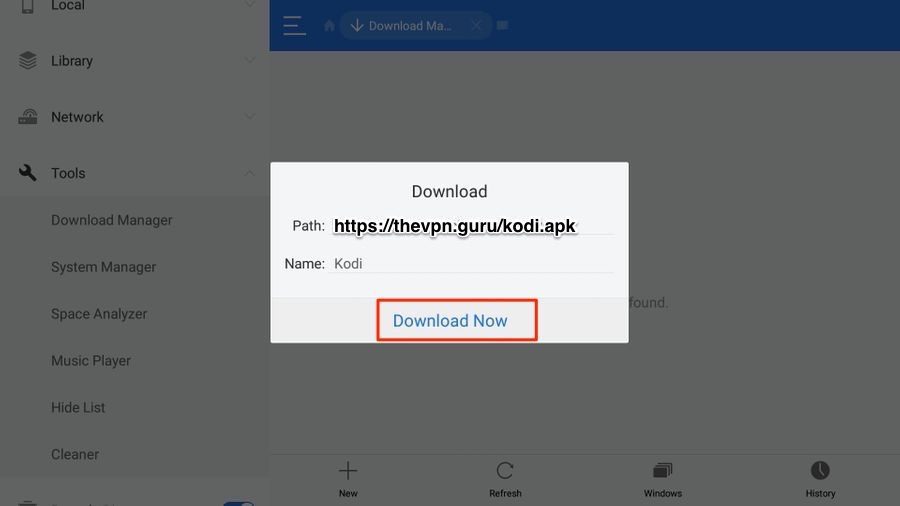
- As for the path, enter https://thevpn.guru/kodi.apk and click OK.
- You can name the file whatever you want. It’s better to call it Kodi to avoid any mix-up.
- Select Download Now.
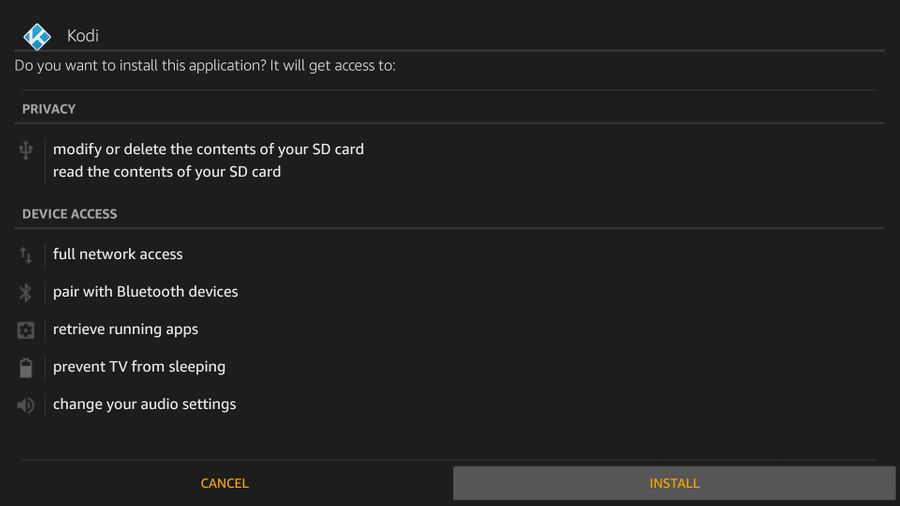
- Your download will start immediately. Once done, open the file and install it.
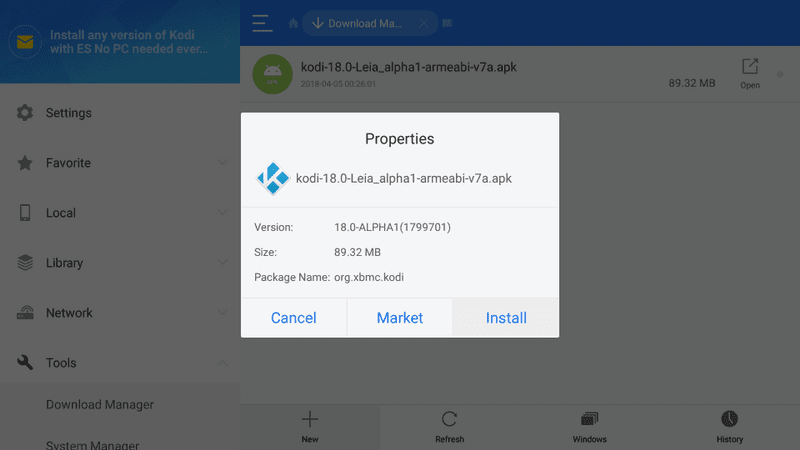
- A black box will appear, hit Install one more time.
- The installation will take a few seconds. As soon as it’s done, go back to your FireStick’s Home Screen.
- Activate the Kodi app and head a bit further to the south to learn how to install Kodi-addons.
File Explorer Alternative – Downloader App
File Explorer didn’t cut it for you? There’s an equally good alternative, enter Downloader:
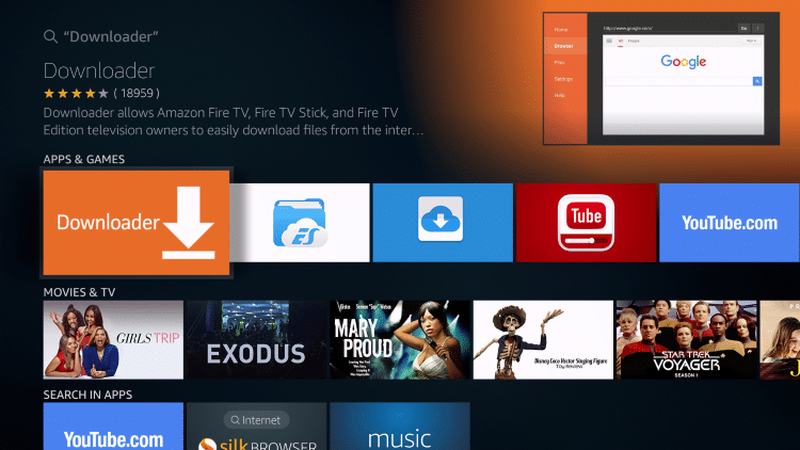
- Follow the same steps as you did with ES File Explorer until you reach the search part.
- Here you need to submit Downloader instead.
- Click on the Downloader application.
- Now, download and install the application.
- Your installation will begin, just wait a few seconds.
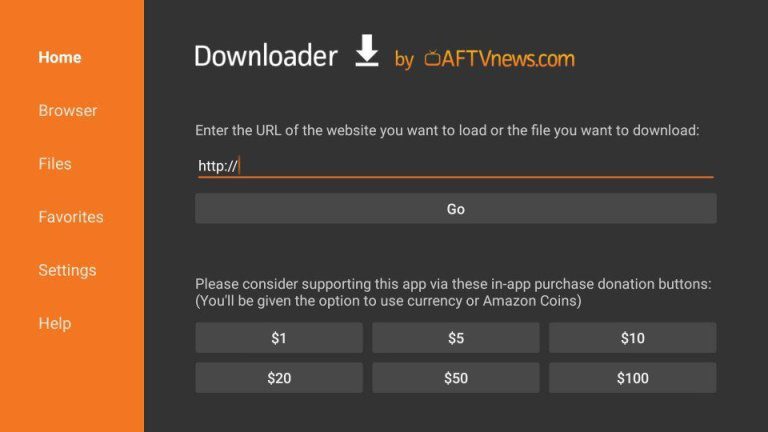
- You’re ready to get Kodi. Launch the Downloader app.
- On the main menu, you need to submit the following path: https://thevpn.guru/kodi.apk and hit go.
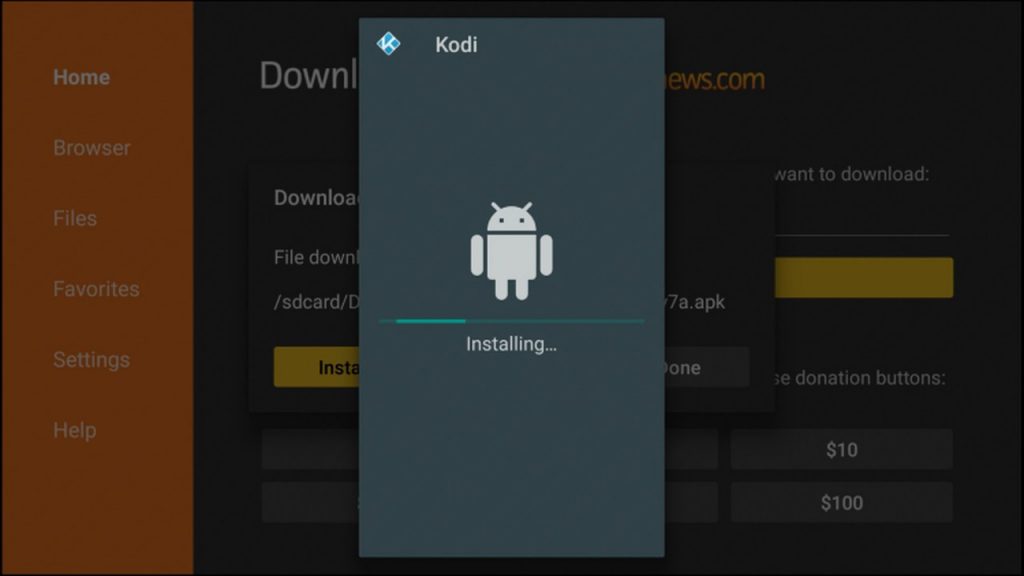
- Download the file after that launch it in the downloader app.
- You’ll be asked to give permission, click install.

- The installation process will take a few moments. Give it up to 1 minute.
- When you get the installed sign, a small pop up will appear on the bottom right of the screen.

- You can click on that little pop-up or go back to the main screen to launch Kodi.
- Now you can use Kodi on your Fire Stick.
How to Install Kodi 17 on FireStick using App2Fire
Apps2Fire will let you upload every Android app from your smartphone or tablet to your Firestick or Fire TV with ease. In case you own an Android Smartphone or tablet, you can use this alternative method to install Krypton on your FireStick.
Step 1: Installing Apps2Fire on Android Device
First, you need to get the Apps2Fire app, it’s really quite simple.
- On your Android device, go to Play Store and search for Apps2Fire using the search bar.
- Click on the Install button to download it on your Android device.
- You’re done. If you don’t have Kodi on your Android, download it as well.
Step 2: Install Kodi on FireStick via Apps2Fire
Now, this is the tricky part. It’s fun if you get to know your way around it actually. Let’s start:
- First, you have to head over to your FireStick’s Developer Options.
- After that, enable the Apps from Unkown Sources and ADB Debugging Options.

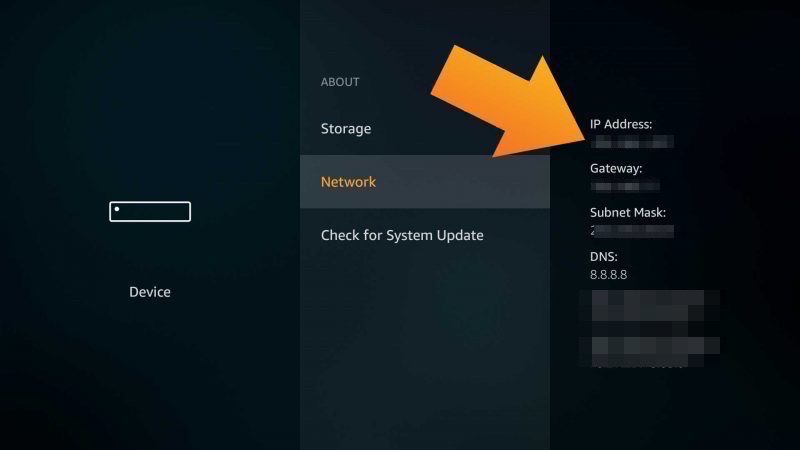
- Head back to FireStick’s settings and navigate to Network by selecting about.
- There you get to check your device’s IP address. Note it down.
- Activate the Apps2Fire application on your Android device.
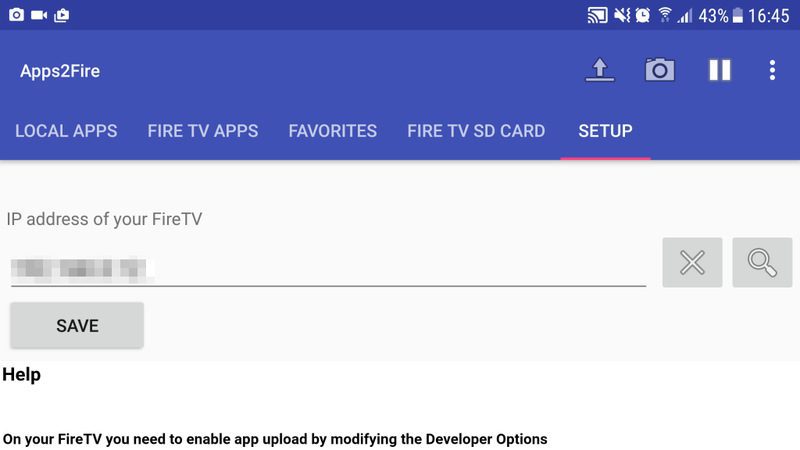
- Head over to Setup and submit your FireStick’s IP address.
- Stay on Apps2Fire and head over to Local Apps, select Kodi.
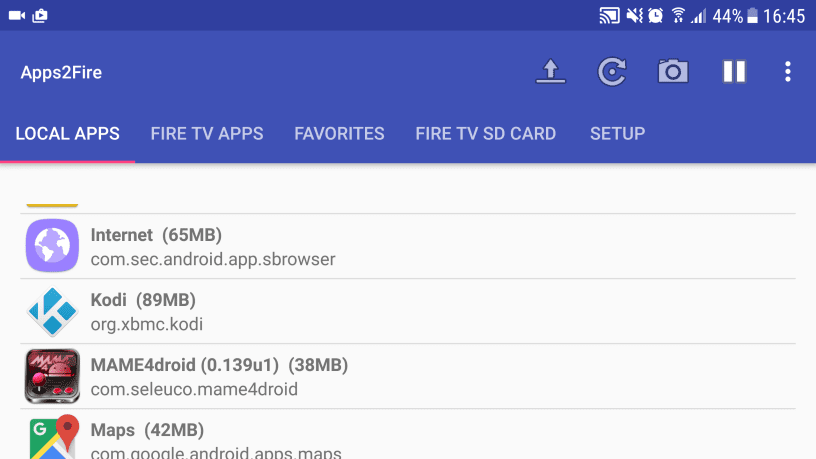
- Tap the app and hit Install.
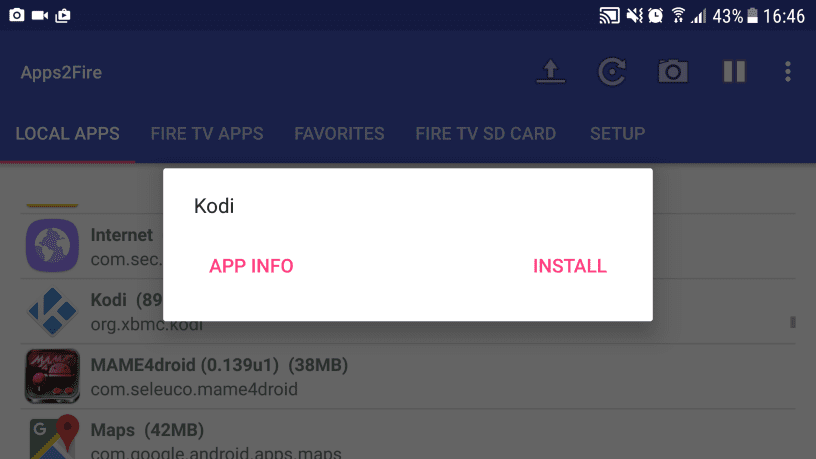
- Once the installation is done, FireStick will inform you. You now have Kodi on FireStick while using Android.
How to Install Video Addons on FireStick
Here’s how you can install official Kodi addons that are safe to use on your FireStick.
- Open the Kodi application on your Fire Stick.
- Head over to Add-ons.
- Click on the Package icon where the cursor is pointing.
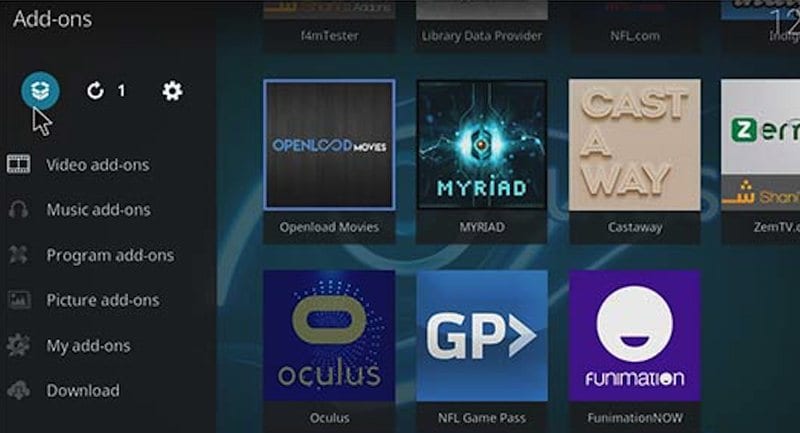
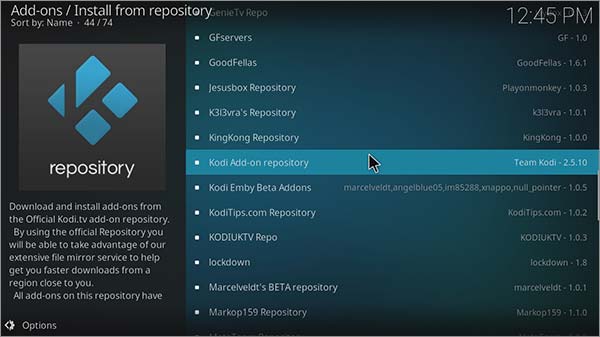
- Select “Install from Repository”.
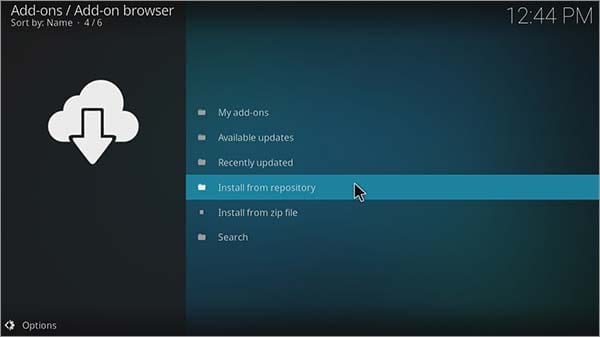
- Scroll through the list and click on Kodi Add-ons Repository.
- Choose Video Add-ons.
- Search for the add-on you wish to get and click install.
- Moments later, an “Add-on enabled” will appear.
- Go back to Kodi home screen and select on Add-ons -> Video Add-ons.
- Choose the add-on you just installed and enjoy.
Kodi with a VPN – Ultimate Streaming and Safety
There are many Kodi addons that are geo-blocked. Using a VPN, a virtual private network will help you with this problem as it changes your online location. But, more importantly, a VPN encrypts all of your traffic. This process prevents ISP and government agencies from eavesdropping on what you are doing online. Your browsing, streaming, and downloading activities can all be monitored. If you want to hide your IP address (Online identity), you need to use VPN.
ExpressVPN is probably the best VPN service to use in order to watch movies and TV shows anonymously on Kodi. A VPN can easily be installed any FireStick. You can also use any of the other VPNs below as well. Behold, the best VPNs for FireStick are:
Last Updated Yesterday

- 30-Day Money-back Guarantee
- Unlimited Bandwidth
- Apps For All Your Devices
- 24/7 Live Support


How to Update Kodi on FireStick?
You can use either method I’ve illustrated above to update your Kodi 17.6 Krypton app on FireStick. By doing so, you will not lose any of the addons, skins, or settings you have previously set up on Kodi.
Install Kodi 17 on FireStick – Summary
As you saw above, it’s not impossible to get such a robust application as Kodi on your FireStick. You just have to follow a few steps to reach your goal. Now, tell me, which method did you choose? Was Kodi worth it? Share your experience in the comment section below.
Related Posts


About The Author
Charles
Streaming gadgets geek. Interested in every little thing there is to know about bypassing regional restrictions. An avid believer in the right to protect online privacy. Charles has also reviewed plenty of VPN service providers and knows how to separate the good apples from the bad ones.

I accidentally erased my Kodi instead of updating. I installed it again but it’s not the same. I’m missing something.
Went thru all the steps to update kodi and after it said installing the kodi sign popped up and under it it said add on migration in progress so how long does it take to work and did it update right
I downloaded the new version of Jodi and when I hit open it said installing so when that got done the Jodi sign popped up and under it it said migration in progress how long does it take and did it install right went thru the steps but still waiting
Hello. Trying to upgrade my tvfire stick from 16.1 to 17.4. When I try to get either “es explore” or “downloader” it tells me I don’t have a valid payment billing adresse set up in my amazon account and to update it. Is this necessary? (I’d rather not) is there a way around this?
I watched the video and followed all of the correct steps, but my koditv does not look like yours!! Help?!?
I have the same issue did you figure it out?
It seems my movies buffer only at night and we cant watch certain movies it is not my internet connect any help would be appreciated
Here is a guideline on how to stop or at least reduce buffering when watching videos on Kodi https://thevpn.guru/stop-buffering-kodi-17-krypton-fix
thank you but first i on on kodi 16. something notb17.1 what do i need to do first before i do the solution for the buffering
Update your Kodi app to 17.4 by following these steps: https://thevpn.guru/update-kodi-17-4-krypton-download-install-rc1
hello i was trying to update my kodi and i don’t have a systems setting to go to in the beginning of the video. any suggestions?
Am trying to update my Kodi app on fire tv stick and after the download is finished it tells me the download failed. Am I doing something wrong? I am using apps2fire method.
Follow-up:
The error message states the installation failed [upload successful, pkg: /sd card/download/base.apk, failure [INSTALL_FAILED_NO_MATCHING_A_BIS]]
Were you able to fix this I’m getting the same thing
Can anyone help. I have downloaded kodi 17.3 krypton on an Alexa fire stick. It downloaded fine but when I try to download exodus, latest version, or 1080p extra, they download into my apps but when I go into them nothing opens. My unknown sources is allowed and so is debugging. Only 1 I can get is hallow and it works on sports
After I installed kodi 17.3 it acts like it’s gonna start up but then goes to a black screen andoor stays there until I hit the home button I’ve tried to reinstall and restart nothing works any suggestions???
have tried to use your instructions several times now.every time using a different link to download fusion or exodus.none of them work i keep getting the same message couldn’t receive information.this could be due to network not being connected.would you like to add it anyway.i have tried to add this previously this way and it is worthless.this is so very frustrating.there is nothing wrong with my network.i am not very good with these things but i am also not an idiot.at a total loss with this.
Hi Ron. Try these alternative methods https://thevpn.guru/tvaddons-alternatives-fusion-install-kodi-17-krypton to install Exodus on FireStick
I used http://repo.cazwall.com/sc instead and it worked!
I have attempted all of the alternatives to fusion with no luck. The above link works. If you have been frustrated with this process, you know how to do the rest…
Sorry, this is to Exodus to Kodi 17.3
17.3 installed fine but when I get the part where I’m to add fusion for tv addons I’m left with a cannot connect to network message. My internet connection is strong, my spelling is correct, with no extra spacing etc. I’ve gone over this multiple times and cannot solve it. I am trying to upgrade from 16.1 to 17.3 and so far all I’ve been able to do is lose all my apps. ( not that big of a deal) I’ve followed your instructions and still I get the same can’t connect message. Any further assistance would be appreciated. Thanks.
Try these TVaddons alternatives instead https://thevpn.guru/tvaddons-alternatives-fusion-install-kodi-17-krypton
Thanks again for the reply and the link. I now have Exodus which gives me tons to watch in the way of tv and movies. How do I install/download other apps like Sportsdevil, Prime channel 1, SALTS, etc?
Hi Richard. Install the Simply Caz repo as explained here https://thevpn.guru/install-cazwall-kodi-simply-caz-repo
Thanks again Charles. I hope I’m not just missing something in your instructions. When I get to step 16, “click on video add sons -> Exodus there are only 7 other choices for me none of which are apps I recognize or believe I want or need so I’m still left with kodi 17.3, Exodus and no way to install/download other apps that I want. Another question not so important at this time is how do I delete things such as kodi 17.1, other attempts to get addons that are building up such as cazwall(1), repo, superepo. I’m sure I won’t be needing all of these. Thanks for any assistance.
Thanks again for your reply. I’m not sure if I’m missing something in your instructions or not but when I get to step 16 “click on video addons ->Exodus, there are only 7 other choices for me none of which are apps that I recognize and/or seem to need. I still don’t see a way to get the other apps I’m interested in such as SALTS, indigo, prime wire channel 1, Sportsdevil etc. Another question, tho not as important at this time, how do I delete things such as Kodi 17.1, and 16.1 and/or other items that have built up in my system/firestick such as caswall (1), repo, superrepo, etc. Thank you for any help you send my way.
Try the Ares Wizard https://thevpn.guru/install-ares-wizard-kodi-17-krypton/
As for deleting repositories you don’t need any longer, launch Kodi and the go to Settings -> File Manager -> Long Press on the repo you wish to delete -> Select ‘Remove Source’.
the correct link for Exodus is http://repo.cazwall.com/sc
Tried your way and it worked until I got to step 9 (how to install exodus on firestick) here exodus wouldn’t launch. So tried uninstalling and reinstalling kodi and now it froze firestick box. Any help would be appreciated. Thanks!
I’ve installed 17.3 already have exodus add on but when I try stream it keeps saying no streams available. Any advice?
Able to install 17.3 but then it won’t load the “first run”. I have uninstalled and reinstalled twice now using different websites for path. Please help!
Have you tried the link in the guide above?
Trying to upgrade to 17.3 went through all the steps and it says download failed. How do I get this to work? Trying to do it through my firestick.
Just tried the link and it works perfectly fine. What are you using to download the Kodi 17.3 file to your FireStick?
I just wanted to say thank you. I don’t know if you guys receive enough thanks from people like myself that don’t know didley-squat about developing apps, etc. I don’t do things like this but your instructions were typed so I didn’t have to listen to the video (I’m great at following instructions :-) I just wanted to say thank you from the bottom of my heart for making this so user-friendly.
Hi,
No problem installing on Firestick. But how do I put kodi on home screen? Now have to go through settings and installed apps. Also Kodi main screen isn’t set up to show categories along bar at bottom. Thanks
Follow these steps on your FireStick:
Under ‘Your Apps & Games’, scroll to and select ‘See All’.
Now scroll over to the Kodi app. Click the 3 horizontal lines on your FireStick Remote and choose ‘Move to Front’.
HI!!! thank you for the walk through, it’s been a gem. I am stuck though. I was running Jarvis and decided upgrade to Krypton. I get to the step of installing the zip file from the repos, but when I try to install from the zip file, Exodus does not show in my list of options. What on earth have I done?
Hi Vex. Have you turned on ‘Unknown sources’ in Kodi’s system settings?
First let me thank you for your help. I installed Jodi 17, no issue, did everything for Fusion. On the Exodus part I Click on Fusion, but can’t go further, there appears to be no files. Kodi repos is not there to select
I am having the same problem. I have done the fusion step multiple times, and it keeps saying couldn’t retreive directory information. Due to Network not being connected. What does this mean? I have my wifi going strong, is it another network? I am not techy, and so far, your step by steps have been great!
Hi Becky. I’ve just added an alternative method to install Exodus on FireStick. Check it out in the guide above and let me know how it goes.
Hi, I’ve tried the alternative method and there are still no zip files in cazwall or fusion for me to select :(
Hello Kristy. For the time being, I suggest installing any of these Exodus alternatives instead https://thevpn.guru/best-exodus-alternative-kodi-addons-2017/
After trying various sites to upgrade, I have to applaud you for the fantastic job that you have done in explaining the way…thank you
Hi just installed lastestate version through es and once I open the new kodi, it loads up for the first run then a blank screen comes up and it crashes. Is there any suggestions for what I can do?
Try uninstalling Kodi and then installing it all over again.
Did you manage to resolve this cos im having exactly the same problem and would be greatful for any help
I had the same issue. I fiddled with it for about 2 hours. I finally gave up and installed Jarvis 6.1 and it works well. I used the app DOWNLOADER (fire stick) and downloaded an old version of it.
Been running Kodi v16 for the last year on gen 1 firestick without any issues. Tried upgrading to Krypton using es file explorer and downloader- both fail repeatedly with a parsing error.
All settings are fine – debugging and apps from unknown. Not sure what to do- any help to get Krypton wouldn’t be greatly appreciated. Had to install SPMC but want Kodi.
Hi Jojo. Do you own an Android phone? If yes, perhaps you could try the method involving Apps2Fire.
Been trying to get wrestlemania 33 and raw to work on amazon firestick, wrestling was playing fine with the nemesis build, but after Wrestlenania 33, it won’t play at all, upgraded to Kodi17.1 Krypton, but still not working, an I doing something wrong or is there something else I need to do, ( Kodi Novice )
Hey Wayne. What addon are you using to watch WWE?
Well it was ‘watch Wrestling’ but I’ve just updated to Kodi 17.1 Krypton, and trying to get the Nemesis build to run, which has it all built in, I’ve tried several times to do it, I got ‘Bucks Build’ to load, but nemesis won’t fit some reason??
Omg r u kidding me this is the 4th website ive tried to understand how to install the update all three others failed to work. Urs was the quickest and by far the easiest! Thank you so very much for these instructions that actually work! Kudos
Hey man, followed every step on how to install it. At the end it tells me “app not installed”.
What method did you use to install Kodi on your FireStick?
it says download failed ever method i try
The Kodi.tv website was down. Give it another try now.
Are other people have issues loading kodi 17.1 on a first generation fire stick ????? when first loading kodi comes on then we get a black screen. we tried clearing cache nothing. we tried reinstalling kodi and nothing. we tried full factory reset on firestick and nothing. still get black screen when loading kodi 17.1 for the first time. then when we install kodi 16 jarvis everything good . it runs fine. any help with this ???
Kodi website is down. How do i download now?
I tried updating fire stick via first method. Kodi won’t open after “first run”. Goes to gray screen.
Hi Josh. Try deleting the Kodi app and then re-install it from scratch.
i tried to install es file and downloader app but each time it says “the app you are looking for could not be found”
Hi James. That’s really strange. If you own an Android phone, try using the Apps2Fire method to install Kodi on your FireStick instead.
If you don’t have a credit card on file with Amazon it gives you that message.
I have been using Kodi for a bout 2 weeks. Yesterday I entered a place (don’t remember how a navigated into it where the icons were a man’s face half red/half the union jack. Can anybody please tell hoe to get there?
Hello Mario. You’re probably referring to the UK Turk Playlist addon. Here’s the installation tutorial just in case https://thevpn.guru/watch-uk-tv-kodi-live-free-stream
That is the UK Turks add-on
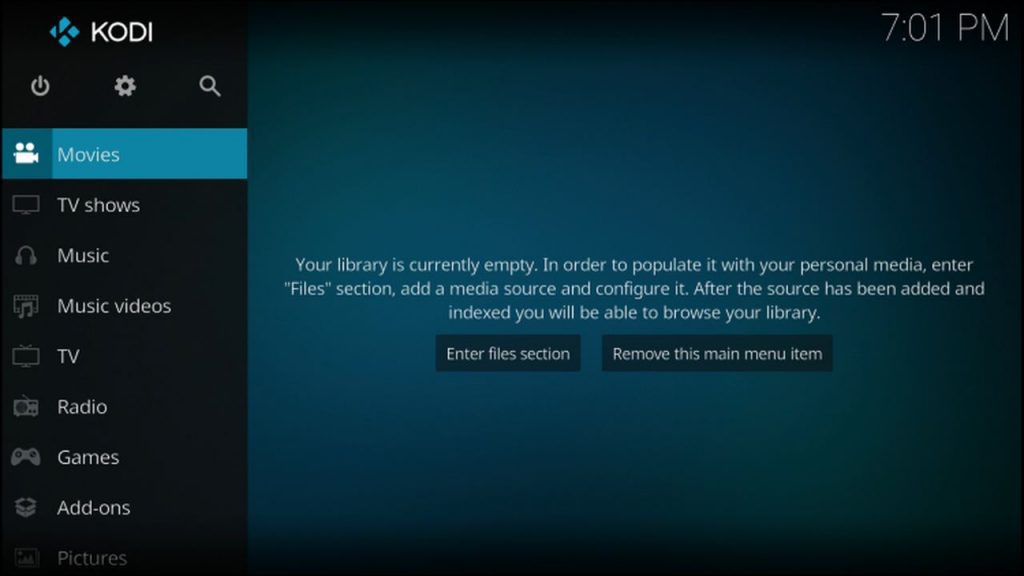
I did install with the directions above but a screen pops with this message “your library is currently empty In order to populate your personal media enter the “file” section add a media source and configure it. After the source has been added indexed you will be able to browse your library. options to enter files or remove this menu from menu item……………………. Please tell ne what I need to do. Please. Thanks in advance.
Hi Teresa. Have you performed a library scan. You could use an information provider as explained here http://imgur.com/a/ZpEYD to rectify the issue.