How to Install VPN on Router – The Easy Way
How to setup a VPN connection on my router? It’s a question that we get asked a lot here at The VPN Guru. Installing VPN on Windows, Mac, Android, or iOS is relatively easy thanks to dedicated VPN apps. However, many devices do not have a VPN client. Therefore, you will have to install VPN on your router instead. That way, any device connected to that router will share its VPN connection. This includes your PS4, Xbox One, Smart TV, Apple TV, Roku, and Amazon Fire TV Stick. In the ‘How to install VPN on router’ tutorial below, you can find detailed instructions on how to setup a VPN connection your router.

How to Install VPN on Router – The Easy Way
Best VPN for Routers
Before starting to set up a VPN connection on your router, you have to sign up with a VPN service provider first. Reliable premium VPN services will set you back around 8 to 10$ a month, but the investment is well worth your money. We’ve reviewed quite a lot of VPNs over the years. Here are the top VPN providers for routers as of 2017. All of the VPNs below have excellent customer service which is essential when setting up VPN on your router. It means there’s always a helping hand willing to instantly assist you just in case you do run into any issues during the installation process.

- Best for streaming and privacy
- High speed servers in 160 VPN locations
- Works for Netflix, BBC iPlayer, Amazon Prime Video, and Hulu
- 24/7/ live chat support
- 3 extra months free on annual plan

- UltraHD streaming
- Free Smart DNS proxy
- Unblocks all major streaming services
- Limited Time 72% Discount

- Unlimited VPN connections
- Over 1000 servers
- Ad-blocking feature available
- User-friendly application
- Exclusive Smart VPN feature
- Standalone Smart DNS subscription available
- Extra security features
- Extensions for Firefox and Chrome
- Split-tunneling available
How to Install VPN on Router – Step By Step
First Step – Install DD-WRT
First of all, you need to know that not all routers are VPN compatible. If you own an ISP modem, you most certainly cannot install VPN on it. If your current router isn’t VPN-ready, you can purchase a VPN-compatible router and then connect that secondary router to your current router. All you need to do is connect the VPN router’s WAN port (Internet port) to your current router’s LAN port using an Ethernet cable. Take a look at the illustration below. Router 2 in this case would be your VPN-enabled router whereas Router 1 is your modem.
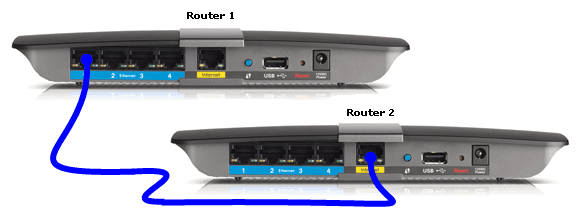
Connecting Two Router using an Ethernet Cable
Once you have connected the two routers as shown in the image above, the second router will share the first router’s Internet connection. Now you can install DD-WRT on the second router and subsequently setup a VPN connection on it. Here’s a list of the most popular VPN compatible routers. Keep in mind that installing VPN involves flashing your router with DD-WRT. So, be extra careful.
- Asus
- Belkin
- Buffalo
- Cisco
- D-Link
- TP-Link
- Linksys
- Mikrotik
- Netgear
You can find the complete list of DD-WRT compatible routers along with their model number here. Once that is done, you can begin with the DD-WRT installation using this guide.
Second Step – Install VPN Client on Your Router
Assuming you have signed up with ExpressVPN, you’ll receive a welcome email that includes the necessary licenses. Once you click on that link, follow these steps to setup VPN client on your router. If you’re using a different VPN service, that necessary instructions are practically the same as well.
- Log into your ExpressVPN account and choose ‘Setup ExpressVPN’.
- Choose ‘Manual Config’ and then select ‘OpenVPN’.
- Download the ‘.ovpn’ file to your PC or Mac.
- Now, open your router configuration. You can do that by typing your router’s IP address in your browser’s address bar. Most routers have 192.168.0.1, 192.168.1.1, or 192.168.1.254 as their IP address.
- From the DD-WRT control panel, choose ‘Services’ and then ‘VPN’.
- Make sure to enable to ‘Start OpenVPN client’ option.
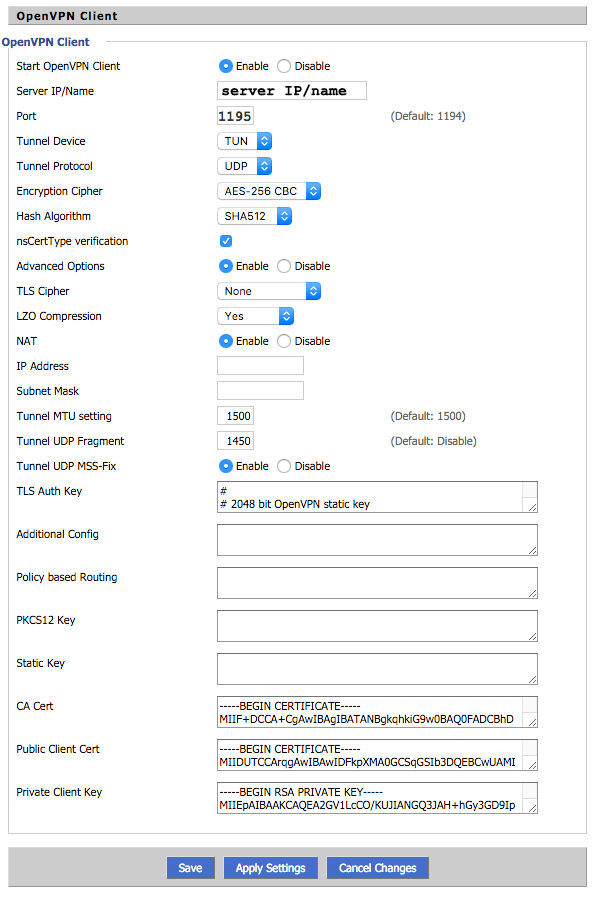
- Now, you need to enter the ‘Server IP/Name’, ‘Port’, TLS Auth Key, CA Cert, Public Client Cert, and Private Client Key.
- For both Server IP/Name and Port, open the .ovpn config file you have downloaded earlier using text editor.
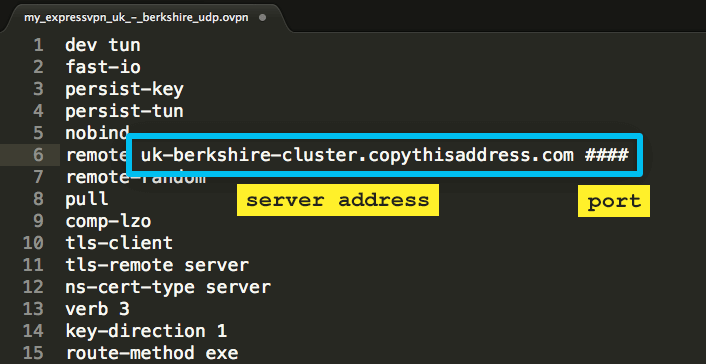
- From the .ovpn file, copy the text between <tls-auth> and </tls-auth>. Then, paste it in the TLS Auth Key field.
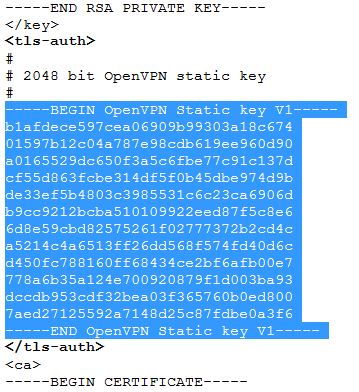
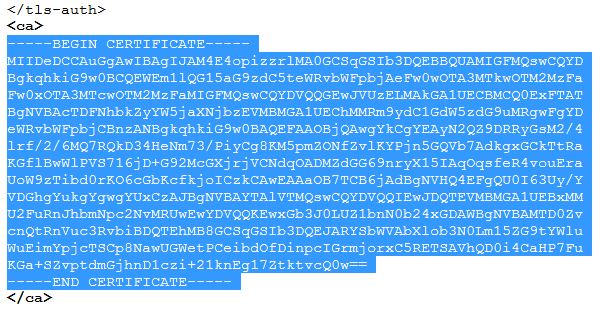
- For CA cert, copy the text between <ca> and </ca> and paste it in the CA Cert field.
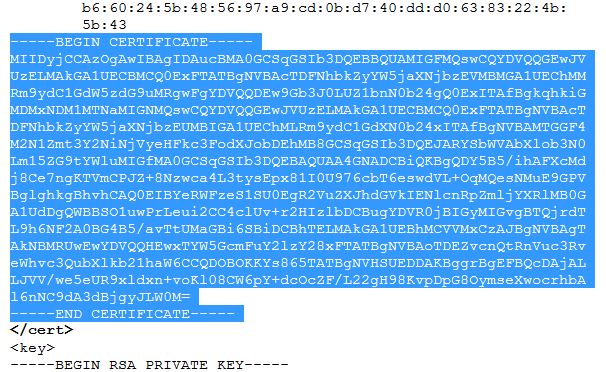
- Copy the text between <cert> and </cert> and paste it in the Public Client Cert field.
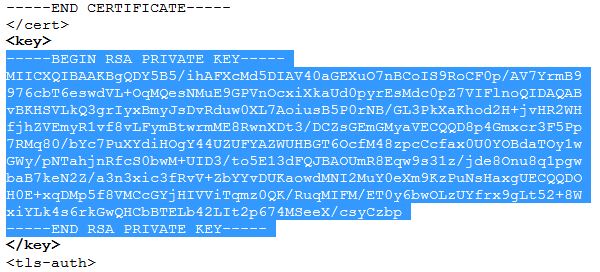
- Finally, copy the text between <key> and </key> and paste in in the Private Client field.
- Click on Save, and then click Apply settings to start the connection to the VPN.
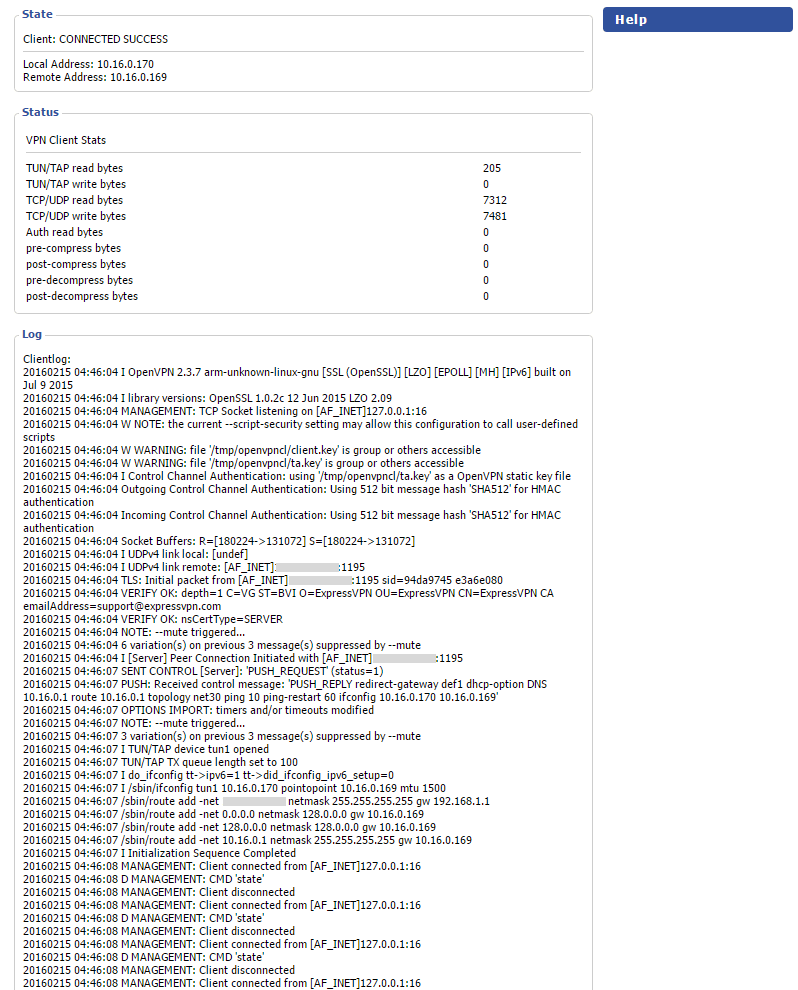
- Now, Click on Status > OpenVPN. If you have correctly configured the VPN client on your DD-WRT router, you should see the ‘Connected Success’ status.
How to Install VPN on Your Router
Installing VPN on a DD-WRT or Tomato-based router can be quiet a task. However, if you follow the instructions carefully, the whole process should take less than 15 minutes. In the end, all your devices will be able to be benefit from a VPN connection. That means all your Internet traffic will be securely encrypted. You will also be able to wave good-bye to any geographic restrictions imposed on your favorite streaming services including Netflix, HBO GO, Hulu, BBC iPlayer, Hotstar, and many others.


I am purchasing an LG Smart TV, My internet is through my cable box which houses the router. How do I set up a VPN for extra security. I don’t have a separate route or modem. Can you still set up a VPN in the cable box?
Hi,
I have two questions:
First – would you be able to have two connections available through the two router method? One that is from the VPN router and one that is from the original router? That way you could choose to be on the VPN connection or not?
Second question – can you alter the geographical region easily, or does that require you to log into the router settings once the VPN is set up?
Hello Rosi. Theoretically, you only need to set up the VPN connection on the second router. Depending on your router model, you can then choose whether to establish the VPN connection or leave it disconnected. Regarding the second question, you do need to change the VPN server name depending on which region you wish to connect to. The names of the VPN servers are provided to you by your VPN service provider. Let me know if you have any other questions.
When using VPN (NordVPN in my case) many URLs cannot be found. So setting up my router will as VPN will restraint access to these URLs. I cannot connect and disconnect the VPN each time !!!
What is the reason?
Do you mean various websites won’t open once you establish the VPN connection on your router? If that’s the case, I would suggest contacting NordVPN support about the issue.
Can i download the dd wrt of the router.?
You can get detailed instruction on how to set up DD-WRT on your router in this tutorial.
If I go with the 2 router option with the intent of taking the second one abroad does anything get changed on my original router? ie when I remove the second router, is the first just as it was? Can I screw it up if making a mistake setting up the second router?
Hello Joanna. In that case, your first router will not be affected in any way. You can simply disconnect the secondary router and then plug it into the new router you intend to use abroad.
Is this something I should do in the US and then take the VPN compatible router for use overseas?
Hi Joe. Yes that would definitely work.
Will this method work with a modem/router provided by my ISP
Probably not. You need to purchase a VPN compatible router and then connect it to your modem using an Ethernet cable.