How to Install a VPN on a Tomato Router
Many VPN users want to know how they can install a VPN client on their Tomato router. Installing a VPN on a router is a great way to extend a VPN’s protection to all of your internet devices without having to manually configure every non-VPN ready device. In this guide, I’ll be explaining why you’d want to use a Tomato router, which VPN you should be using, and how to set up a VPN client on your Tomato router.

How to Install a VPN on a Tomato Router
What is Tomato?
Tomato is an open-sourced firmware option that can boost a router’s functionality. Firmware is the operating system that a router uses. Just like with DD-WRT, you can flash your router (change the firmware) using Tomato to unlock a wide range of router capabilities. With Tomato, your router will be able to:
- Increase your wireless coverage.
- Monitor your bandwidth.
- Secure your network.
- Segment your wireless network via VLAN support.
- Integrate BitTorrent & Tor Client on your router.
Tomato routers also have the ability to support VPN installations. Installing a VPN on your router allows you to protect all of your connected devices simultaneously. You will also be able to extend a VPNs’ ability to unblock regional restrictions to any device you want. In other words, this will cover devices that don’t have a native VPN app like Xbox One, PS4, all Smart TVs (Apple, Android, and Fire Stick included).
Best VPN for Tomato Routers
Before you start the configuration process I’ll be dictating below, you need to know which VPN you should be using on your Tomato router. Our VPN expert, Charles, has already penned a detailed article on the best VPNs for Tomato routers. In the article, Charles suggests using ExpressVPN on your Tomato routers because of the VPN’s configurability and long list of impeccably delivered features.
There are two ways you can configure your VPN on a Tomato Router: OpenVPN and PPTP. I’ll be explaining how to install a VPN client using both protocols before. Please note that I will be using ExpressVPN to show you how to go through both methods. If you’re not using ExpressVPN, you can still use the steps I mentioned below to install the VPN client.
How to Install a VPN on a Tomato Router Using OpenVPN
The first method you can use to install a VPN client on your Tomato Router is by using OpenVPN. Here is how to do that, step by step, using ExpressVPN:
Preping for Installation
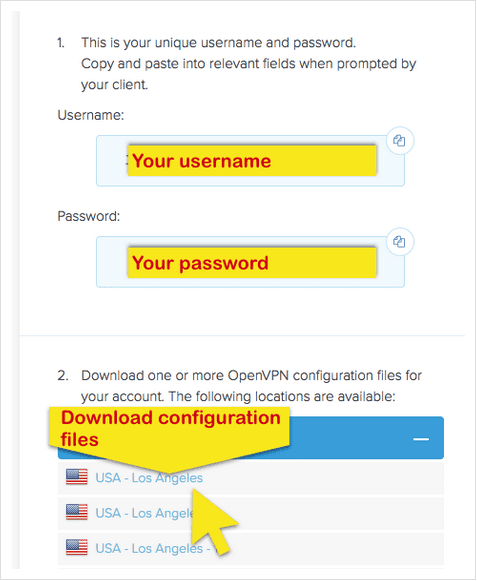
- Sign in to your ExpressVPN account. Click on Set Up on More Devices.

- Click on Manual Config (left side of the screen) then select OpenVPN (right side of the screen).
- Copy and Paste the Username and Password into a document to refer back to later.
- Download and save the .ovpn file or location you wish to connect to from the list of OpenVPN configuration files.
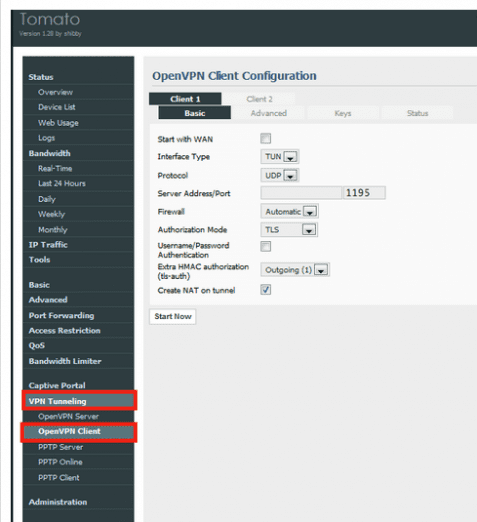
- Open a new tab on your web browser and go to your router’s settings page (control panel). You can do this by typing in the router’s IP into the browser’s address bar. By default, this will be 192.168.1.1 or 192.168.2.1.
- Click on VPN Tunneling then select OpenVPN Client.
The Installation Process
- In the Basics tab, copy the settings below. Enter the username and password you saved in step 3.
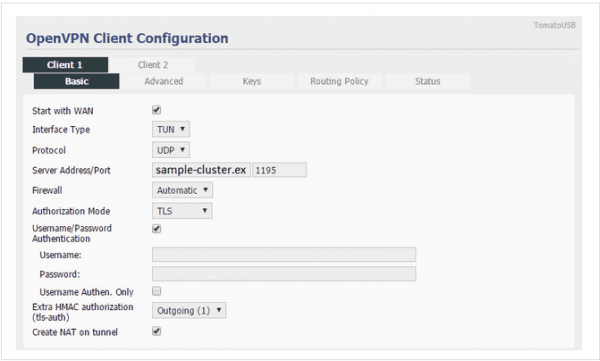
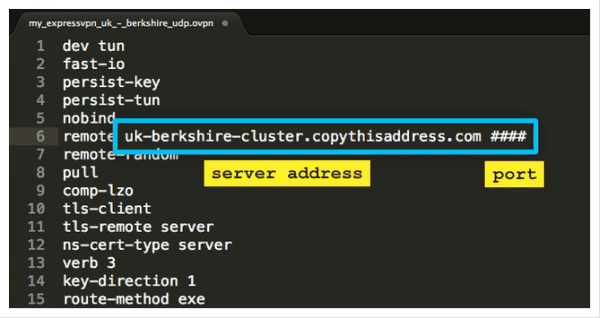
- In the Server Address/Port field you see above, you need to open the .ovpn file in a text editor (like Notepad) and copy/paste the remote server cluster name and the port:
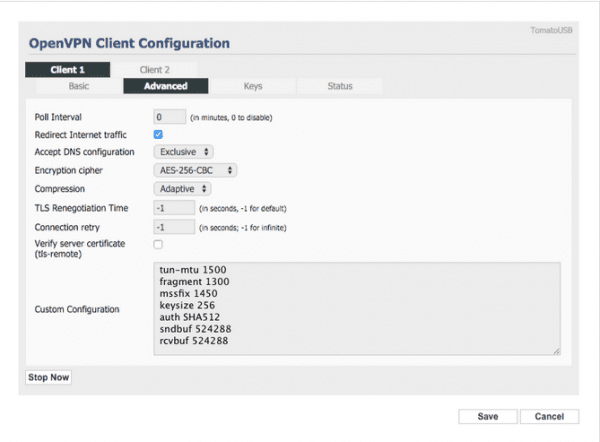
- Go to the Advanced tab. Copy the info in the screenshot below into the Custom Configuration field. Next, click Save.

- The Advanced tab’s info should look like the below screenshot:
- To fill in the Keys tab, you need to copy and paste information off of the .ovpn file.
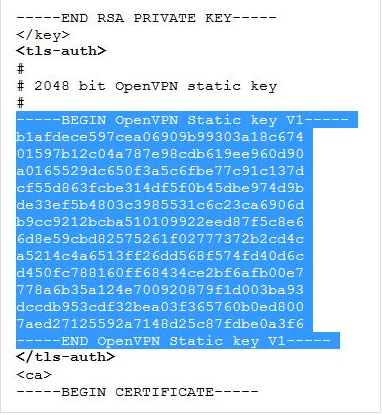
- For the Static Key field, search for the <tls-auth> and </tls-auth> tags and copy the text in between. Start with “BEGIN OpenVPN Static Key” and stop after “End OpenVPN Static Key”. Paste the information into the field.
- Certificate Authority field: search for the <ca> and </ca> tags.
- Client Certificate field: search for the <cert> and </cert> tags.
- Client Key field: search for the <key> and <key> tags.
- Click on Save.
Your VPN client is now installed onto your Tomato Router! To connect to a VPN server, click on Start Now and wait for the connection to be established.
You can check the status of your connection by clicking on the Status tab.
How to Install a VPN on a Tomato Router Using PPTP
The second method you can use to install a VPN client on your Tomato Router is by using PPTP. You should know that this method is less secure than using OpenVPN. Here is how to do that, step by step, using ExpressVPN:
- Sign in to your ExpressVPN account. Click on Set Up on More Devices.
- Click on Manual Config (left side of the screen) then select PPTP & L2TP/IPSec (right side of the screen).
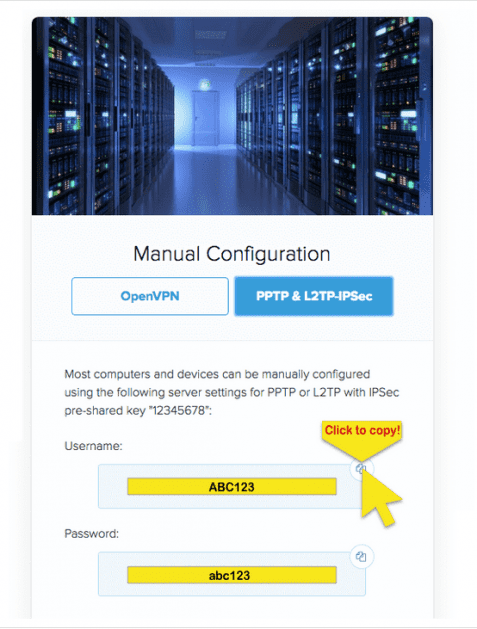
- Copy and Paste the Username and Password into a document to refer back to later. Also, copy the Server Address you want to be using.
- Open a new tab on your web browser and go to your router’s settings page (control panel). You can do this by typing in the router’s IP into the browser’s address bar. By default, this will be 192.168.1.1 or 192.168.2.1.
- Enter the admin name and password for your router. Click on Log In.
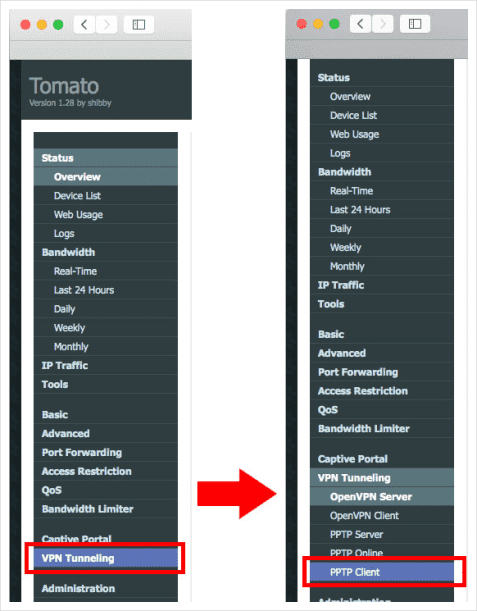
- Click on VPN Tunneling in the left-hand menu. Select PPTP Client.
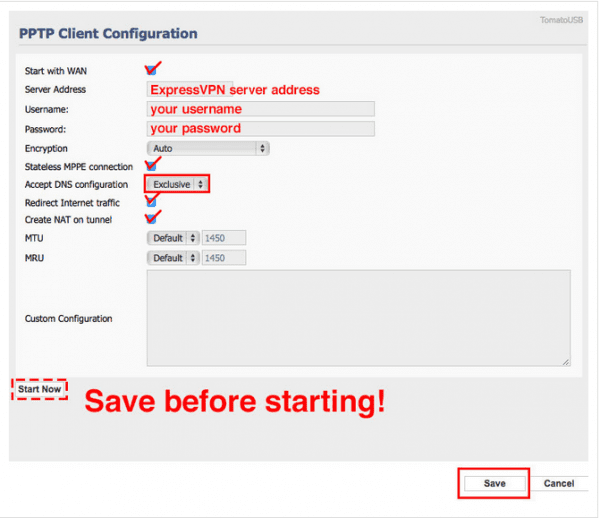
- To configure the PPTP client, you should do the following:
- Check the Start with WAN field.
- Enter the server address, username, and password you saved in step 3.
- Select the Auto option for the Encryption.
- Select the Exclusive option for the Accept DNS configuration field.
- Check the Stateless MPPE connection field.
- Check the Create NAT on tunnel field.
- Click on Save. The PPTP Client Configuration should look like the screenshot below:
Your VPN client is now installed onto your Tomato Router! To connect to a VPN server, click on Start Now and wait for the connection to be established.
To disconnect from the PPTP VPN connection, click on Stop Now in the PPTP Client Configuration window.


