
What is I2P? Invisible Internet Project Explained
Anyone who’s actively looking for a way to use the internet anonymously has probably heard about the darknet I2P by now. This particular network captured the world’s interest when it was revealed that the dark-web site, The Silk Road, found its new home on the decentralized network. Read on to understand just what I2P is and how you can install it onto your system.

What is I2P?
Short for the Invisible Internet Project, I2P is a decentralized anonymizing network. The best way to understand this network is to think of it as an internet within the internet.
Let me explain.
In a sense, I2P relies on P2P networking to maintain it’s functionality as a network that’s only accessible through its own software. However, unlike P2P networks, it offers its users the ability to select the length of the tunnels the network uses. In other words, you get the connectivity of a P2P network with the added bonus of an anonymous tunnel system. See, when you change the length of the tunnels your information is passed through, it makes it incredibly difficult for anyone to figure out just what’s being sent, where it’s going, and where it originally came from.
How is I2P Different Than Tor?
I would state that the only similarity between I2P and Tor is the idea that they both anonymize your communications. However, comparing both services is very much like comparing apples to oranges. While both Tor and I2P allow users to access the Dark Web, there are a few key points that make them stand out as two different services:
- Tor is a directory-based anonymizing network, which means that it has a centralized point that manages the overall network. I2P, however, is decentralized and relies on its users to store their content on their systems. You will only be able to access an I2P eepsite (the network’s version of a website) if the content creator is online.
- I2P wasn’t initially made with the clearnet (normal internet) in mind. As such, it offers its users few options to connect to the clearnet using the network. Tor, on the other hand, allows users to browse the clearnet anonymously using its browser.
- Tor has been an established anonymizing network for years now and has garnered a large user base. I2P, on the other hand, is still in its beta form and has yet to reach a user base that would give it the authority of Tor and other darkness.
- Because of its beta level, I2P is more prone to have bugs in its program than Tor.
- Tor uses onion routing to pass the information anonymously through its network. I2P uses what is known as Garlic Routing.
What is Garlic Routing?
If you’re already familiar with Tor (The Onion Router), then you’ve probably heard of the idea of onion routing. Onion routing is when information is encrypted in layers, similar to an onion, so as to travel down the network to its destination without allowing any third-party access to the information it’s carrying.
Garlic routing, on the other hand, is a little different. Instead of encrypting the data in layers, garlic routing works on encrypting multiple messages together to make it even more difficult for a third-party to access all of the information being relayed. Similar to an actual clove of Garlic, Garlic routing makes it more difficult for hackers to perform traffic analysis on your communication.
How to Set Up the I2P Network
If you look for installation guides online, you’ll usually come to the same conclusion I did a long time ago: developers don’t write in a way where non-developers can understand. Seeing as I2P is open-sourced, most of the installation guides you’ll see were written by developers, and as such are a little confusing.
To help you guys out, here’s a detailed installation guide that should help you get started. Please note that I have not gone into details about what you can do with your I2P Router simply because this is a beginner’s guide. I do not suggest tampering with many of I2P’s functionalities if you don’t already know what you’re doing. If you’re tech-savvy and have an intermediate understanding of proxies, then the network’sFireFsdsfssssssssss website has a lot of helpful information for you to configure your Invisible Internet Project to your liking.
Downloading the Proper Files
Before you start anything related to I2P, you need to make sure that you have Java installed and running on your system. If you don’t have Java on your device you need to download the program off of their official site. Download the version of Java that works on your specific system and install it.
After you install Java, you can start with I2P. Go to the official site and download the files that work on the type of device you own. You can find downloadable versions for:
- Windows
- Mac OS X
- GNU/Linus / BSD / Solaris
- Debian/ Ubuntu
- Android
Sadly, iOS still doesn’t have a working version of I2P.
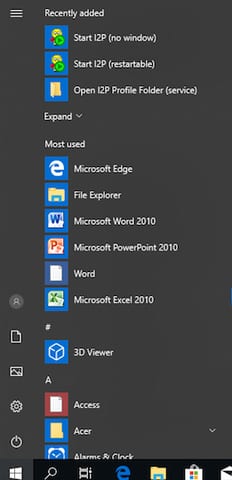
Once the file is downloaded, install it on to your system. To make things easier for you later, make sure to allow I2P to create a shortcut for you in your start menu.
Configuring your I2P Network
Now that the program is actually available on your system, it’s time to discuss how to set it all up. I do want to note that this process is technical by nature. Despite the technicality, it shouldn’t take you long to get used to using I2P. Here’s how to configure the network on your system:
- Access your I2P Router. You can do this by clicking on Start I2P (restartable) in your start menu.
- Your default browser will automatically open to the Router Console.
 You’ll notice that both a console window and a browser window containing the router will open, do not X out of the console window.
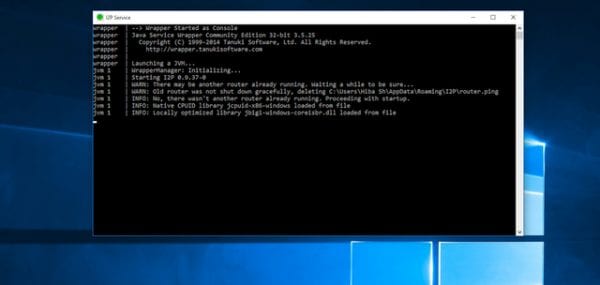
- Open Firefox. While you can use any browser for I2P (including Tor), I do suggest using Firefox over Chrome or Internet Explorer.
- Click on the Menu bar at the right upper hand corner of the browser. Select the General Options tab and scroll down to Network Settings.
- Click on Settings.
- Toggle on Manual Proxy Configuration.
- In the HTTP Proxy field, type in 127.0.0.1
- Type in 4444 for the Port field.
- In the field titled No Proxy For, type in localhost, 127.0.0.1
- Press OK.

NB: If you plan on using this network often, I suggest downloading Firefox’s FoxyProxy extension to change proxy settings quickly. FoxyProxy is an extension found on Chrome and Firefox and helps you toggle on the network settings specific to I2P with a single click. If you’re looking at downloading FoxyProxy, use the configuration settings in the screenshot below.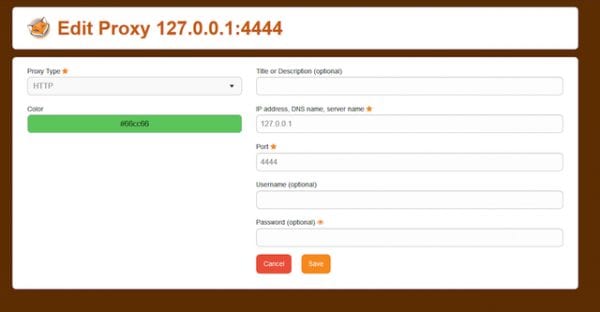
What You Can do With I2P as a Beginner
There are a few things you can do with I2P as a beginner without having to get too technical.
- Torrent. I2P actively encourages Torrenting as part of its freedom of speech motto. That being said, torrenting off the network itself is limited to whatever is available on the network. While you won’t be able to find the same amount of torrentable content as on the clearnet, you will still have a decent choice of files to download. If the idea of limited content seems horrible to you, you can use Vuze (torrent program) and enable its I2P addon to torrent anonymously.
- Mail. Users have access to what is known as I2P-Bote, a fully decentralized and distributed anonymous email system that primarily focuses on security. Users also have access to Susimail, a pseudo-anonymous web-based email client that focuses on security and privacy.
- Eepsite. Every user has access to their very own eepsite, which is the term used to denote I2P websites. Eepsites use the .i2p suffix and are found exclusively on the network. You will only be able to access and eepsite if its user is online, which is, sadly, one of the drawbacks of having a decentralized network.
More advanced users can use IRC to access I2P’s chatrooms. As this requires to you have an IRC client already installed on your system, I won’t be going into this particular functionality. You can, however, get more details on this feature off of the network’s online documentation.
I2P Explained – Final Thoughts
That’s all you need to know to get yourself started. Of course, there are a whole bunch of cool features and functions you can use the network for, but configuring and activating those features does require some form of technical proficiency. For that reason, I’ve kept this guide simple enough for beginners who want to start their darknet journey. For more guides and instructions related to I2P’s more advanced features, I suggest going to their official website and reading through their documentation section.
Related Posts


About The Author
Charles
Streaming gadgets geek. Interested in every little thing there is to know about bypassing regional restrictions. An avid believer in the right to protect online privacy. Charles has also reviewed plenty of VPN service providers and knows how to separate the good apples from the bad ones.
