
How to Install a VPN on Linksys Router
A VPN is an amazing cybersecurity tool that can help keep you safe and private online. It’s easy to get a VPN on your desktop, tablet, or mobile, as most VPNs have apps you can download for those devices. What if you want to access the internet using your PS4, Xbox One, Smart TV, Apple TV, Roku, or Amazon Fire TV Stick? Or maybe you just want a way to make sure every device your family uses is protected? In this case, you’ll want to install your VPN onto your router. In this guide, I’ll take you through the steps you need install a VPN onto your Linksys Router.

How to Install a VPN on Linksys Router
Why Setup a VPN on Your Linksys Router?
VPNs usually come with a limited number of simultaneous device connections. This means that you can only protect a limited amount of devices at the same time. If you configure your VPN onto your router, you side-step this pesky limitation. Once you’ve set up your VPN on your router, anything that connects to the internet through the router will get the VPN’s protection.
This way, you can be sure that all of your devices are secure.
If you have a family, this is a great way to make sure that everyone is protected at all times. Business owners can also hook up their company Linksys routers with a VPN connection and maintain the privacy and security of all of their devices and employees.
Best VPN for Linksys Routers
Charles, our VPN expert, has discussed the best VPN services that can be used on Linksys routers. I highly suggest you read the article to get a better view of the reasons behind his choices. ExpressVPN landed in the top spot, and it’s easy it see why.
ExpressVPN supports OpenVPN protocols. This makes it relatively easy to configure onto devices that don’t support native VPN apps. In fact, many of the new Linksys routers do have an “app” they can download off of ExpressVPN.
If you subscribed to ExpressVPN and have any of the below routers, then you don’t need to finish this guide. ExpressVPN has detailed guides and instructions that take you through the whole process of setting up your VPN onto a Linksys router.
More detailed guides can be found on the following models:
If you don’t have the following models, or don’t want to subscribe with ExpressVPN, read the more general process below.
How to Install VPN on Linksys Router – Step By Step Guide
There are two main steps to setting up a VPN onto a Linksys router. First, you have to “flash” the router.
Calm down.
This just means that you need to install new firmware onto the router. You need DD-WRT firmware for the VPN setup to work. The second step involves setting up the VPN itself. While I will be using ExpressVPN to elaborate on the explanation, the process is the same with any of the VPNs Charles has suggested.
Step 1 – Flashing Your Linksys Router with DD-WRT
The first step, as mentioned above, is flashing your router. Essentially, you’re changing the firmware the router runs on. The great thing about Linksys routers is that most of them are compatible with DD-WRT.
WARNING: This is a technical procedure. The actual flashing process is very straightforward but you need to be careful about what firmware you download. Make sure you know the exact make and model of your Linksys router before you start installing the firmware.
DD-WRT has a comprehensive guide that takes you through every single step of flashing your router. DO NOT skip over the precautions section, and make sure to follow the guide to a T.
Take your time, double check your progress, and don’t be afraid to ask for help.
Step 2 – Installing a VPN Client on Your Linksys Router
I’ll be explaining this step using ExpressVPN. If you’re using a different VPN service, don’t worry. The following instructions work on most VPNs.
- Log into your ExpressVPN account. Go to ‘Setup ExpressVPN’.
- Select ‘Manual Config‘ and then choose ‘OpenVPN’.
- Download the ‘.ovpn’ file onto your PC or Mac.
- Go to your Linksys router’s configuration. You can do this by typing in your router’s IP address into your browser’s address bar. Most routers will have IPs that start with “192.168.”
- You’ll find the DD-WRT control panel (since your router’s firmware is not DD-WRT). Here, choose ‘Services’ then click on ‘VPN’.
- Enable the ‘Start OpenVPN client’ option.
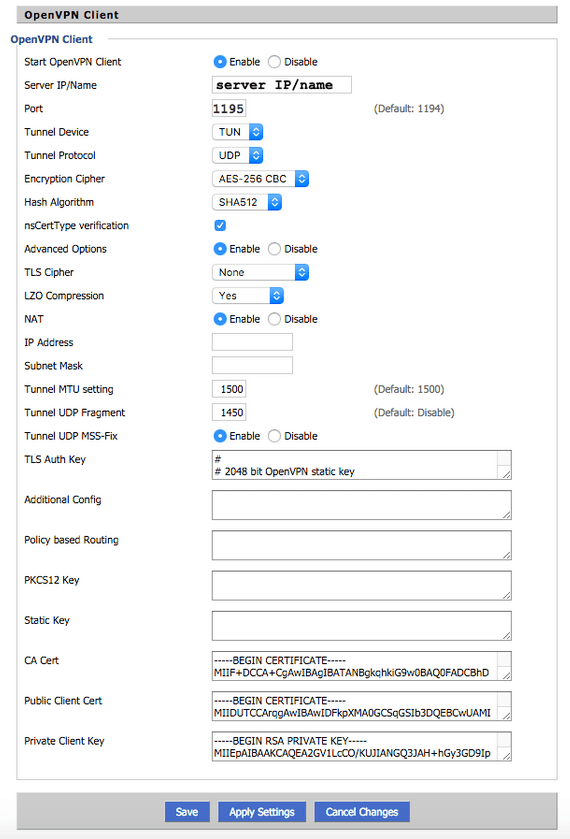
Now, you need to fill in the above information. You are going to fill in the ‘Server IP/Name’, ‘Port’, TLS Auth Key, CA Cert, Public Client Cert, and Private Client Key.
Don’t worry, you’ve already downloaded everything you need.
Technical Installation
Go back to the ‘.ovpn‘ config file you downloaded earlier.
Open it up with a text editor (like notepad).
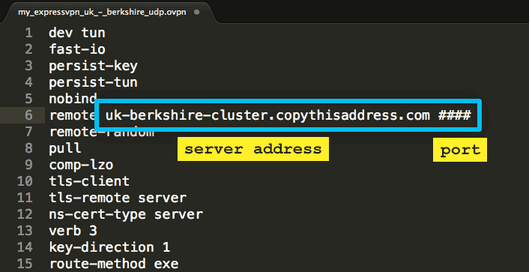
You can find the Server IP/Name and the Port at the beginning of the file. The image below shows you where to look for it. Remember, we blocked out our Server IP/Name and Port in the picture below, but the address and the port will follow the same format.
Now onto the TLS Auth Key. In the same file you opened with notepad, look for <tls-auth>.
Scroll a little further down and find </tls-auth>
Now, copy the text that’s found between them. It should look something like this:

Copy the text highlighted in blue and paste it into the TLS Auth Key field in your Router’s configuration page.
This is the same process you do to find the CA Cert information. Look for the text that falls in between the <ca> and </ca>, and copy/paste that into the CA Cert field.

For the Public Client Cert field, copy/paste the text in between <cert> and </cert>
Finally, for the Private Client field, copy/paste the text in between <key> and </key>.
Now, click on Save, then go to Apply Settings to start your VPN connection. To check if your VPN connection is working properly, go to Status > OpenVPN. You should see “Client: CONNECTED SUCCESS” in the status field.
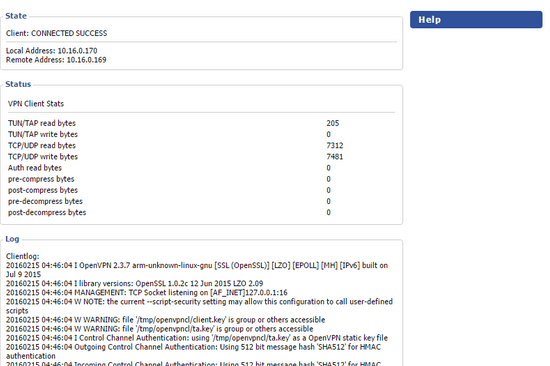
If you see that message in your status field, then you’ve successfully configured your VPN onto your Linksys Router.
Congratulations!
Now, pat yourself on the back and go get a cookie. You deserve it.
How to Install a VPN on a Linksys Router – Final Thoughts
Installing a VPN onto a DD-WRT based Linksys router isn’t easy. While following this guide, make sure you read each step carefully and follow the directions word-to-word. I know it may look too difficult, but all of the resources provided in this guide are chock-full of details and explanations. Once you’ve got your homework done, the whole installation process shouldn’t take you more than 20 minutes, tops!
Related Posts


About The Author
Charles
Streaming gadgets geek. Interested in every little thing there is to know about bypassing regional restrictions. An avid believer in the right to protect online privacy. Charles has also reviewed plenty of VPN service providers and knows how to separate the good apples from the bad ones.

Hello thanks for the info….will this also work on google chromecast which is connected to WiFi?
Hello Nikki. Yes, it will work on Chromecast as well.
I have used VPN on my laptop by installing it in the browser. What advantages will it provide if we will install it on our router? How will it be different than installing in the laptop?