How to Install VPN on Synology NAS – PPTP/OpenVPN Guide
The process of setting up a VPN on your Synology NAS using PPTP might be a bit daunting if one’s not quite sure about how to deal with things. If this sounds a bit challenging for you, then this tutorial should be able to guide you through everything that needs to get done. For this setup, however, we recommend turning off IPv6 as illustrated in the guide below. We divided the Synology VPN installation process into a number of steps:

How to Install VPN on Synology NAS
First Step – Sign Up with a VPN Service Provider
In order to setup VPN on Synology, you have to sign up with a VPN service first. While we do recommend using ExpressVPN, there are other alternatives, too. Here is a list of best VPNs for Synology.

- Best for streaming and privacy
- High speed servers in 160 VPN locations
- Works for Netflix, BBC iPlayer, Amazon Prime Video, and Hulu
- 24/7/ live chat support
- 3 extra months free on annual plan

- UltraHD streaming
- Free Smart DNS proxy
- Unblocks all major streaming services
- Limited Time 72% Discount

- Unlimited VPN connections
- Over 1000 servers
- Ad-blocking feature available
- User-friendly application
- Exclusive Smart VPN feature
- Standalone Smart DNS subscription available
- Extra security features
- Extensions for Firefox and Chrome
- Split-tunneling available
Second Step Look for Your VPN Account Credentials
Using ExpressVPN on Synology requires that you set up a new VPN profile. To do that, you’ll need a server address, your account credentials, and the IPSec pre-shared key. Here’s how to find all that information:
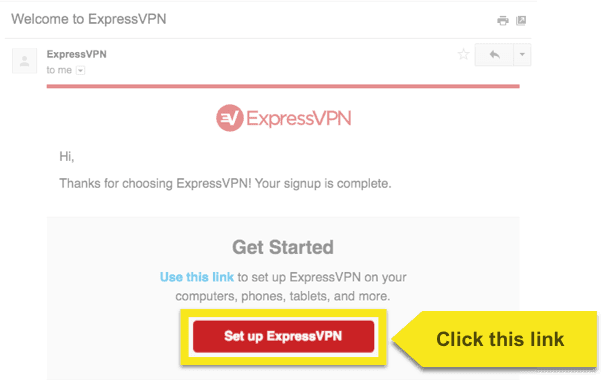
- Start by opening up the Welcome Email that you got when you signed up for ExpressVPN, & click the link in the email.
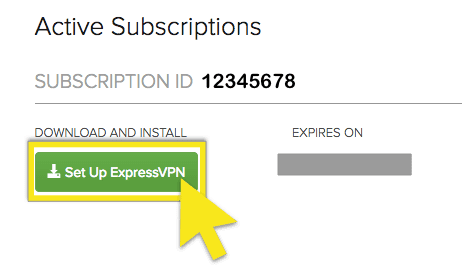
- Having clicked the link in the welcome email, or even logged on into the website, click the Setup ExpressVPN on the Active Subscriptions page.
- Thereafter, the Manual Config setting should allow you to select PPTP & L2TP-IPSec, and set up your username, password, as well as select from a list of server addresses from around the world.
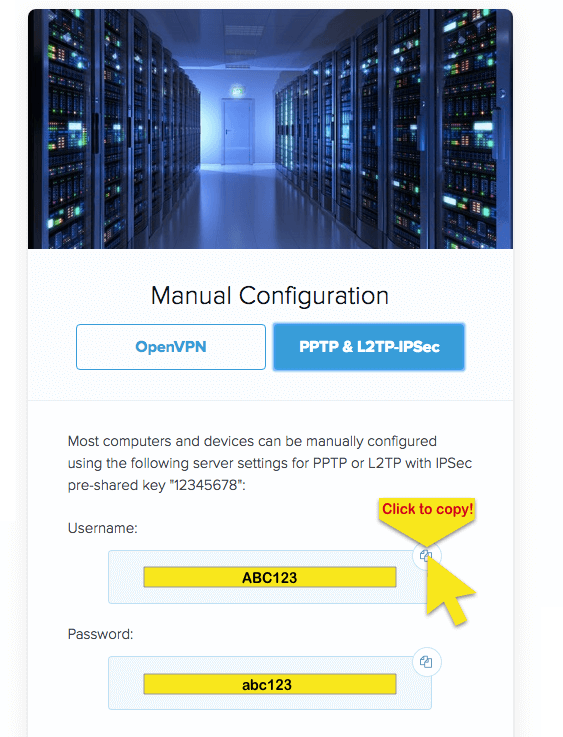
Copy PPTP/L2TP Info
Deactivate IPv6
- As you’ve read above, we highly recommend that you turn off IPv6 so as to prevent IPv6 traffic from leaking outside of the VPN tunnel. To do this, head to Control Panel > Network > Network Interface.
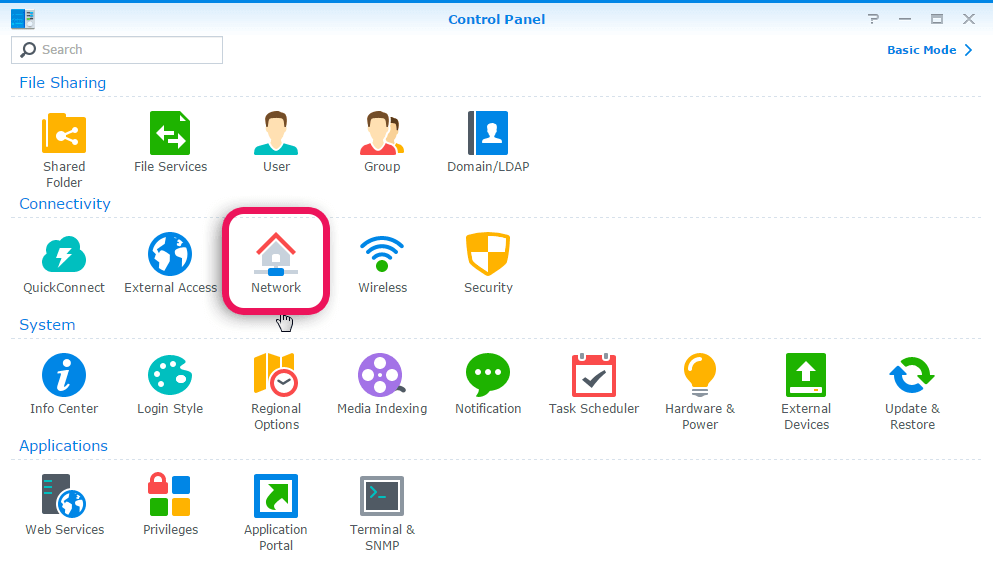
Go to Control Panel
- Go on and click the Network Interface tab, and expand it by clicking the LAN menu. Select Edit.
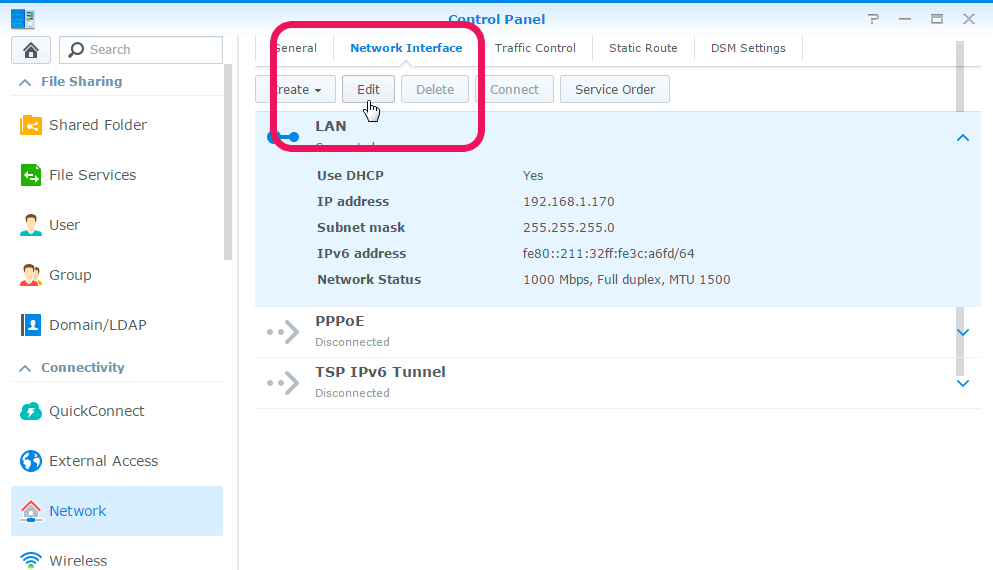
Click ‘Edit’
- Once in this menu, click the IPv6 tab. You should see a list of configurations, choose off, then finish off by clicking OK.
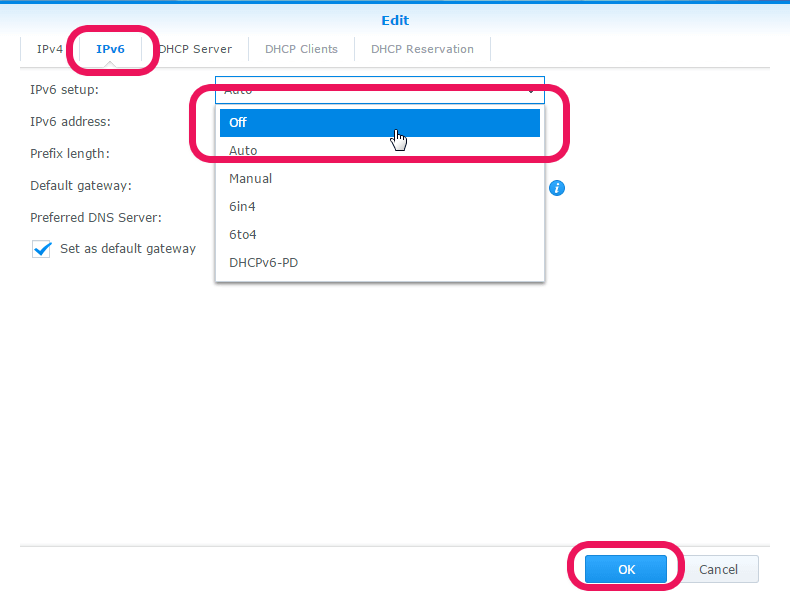
Turn IPv6 Off
Creating a New VPN Profile
Doing this would need you to return to the Network Interface settings by navigating through Control Panel > Network > Network Interface. Choose Create > Create VPN Profile.
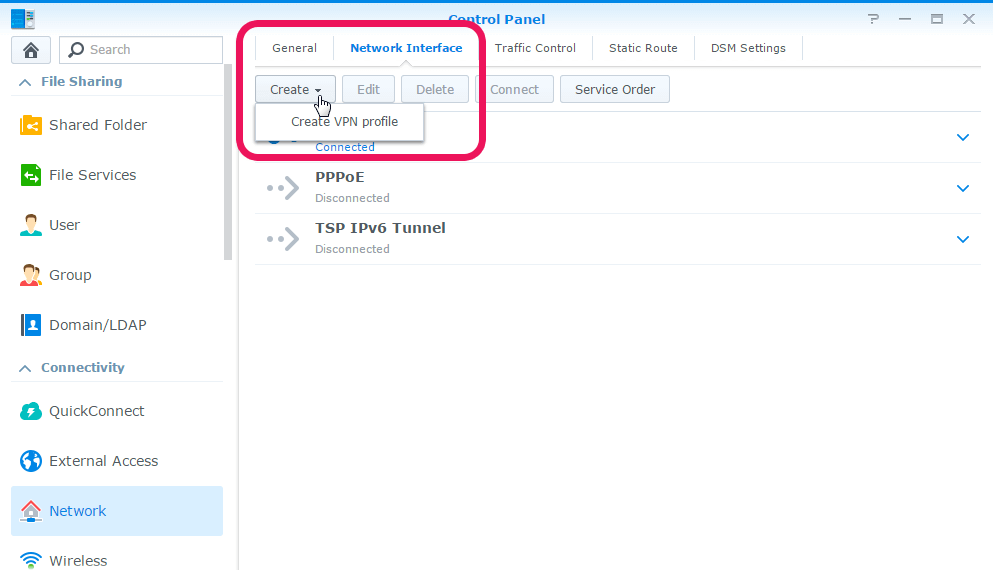
Create New VPN Profile
Setting Up Your VPN Profile
- Now, you’ll need your username, password, IPSec pre-shared key and server address like we said you would earlier. Select PPTP on the VPN Connection Method screen, then click Next.
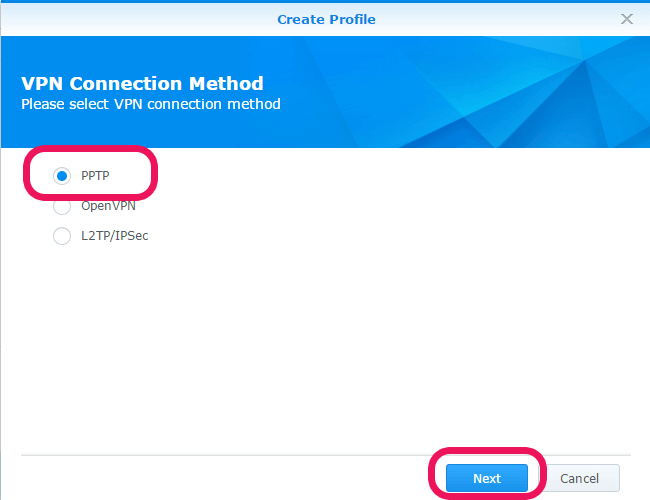
Choose PPTP
- You’ll see the General Settings screen, where you’ll need to type in a username, profile name, server address and password. Click Next when done.
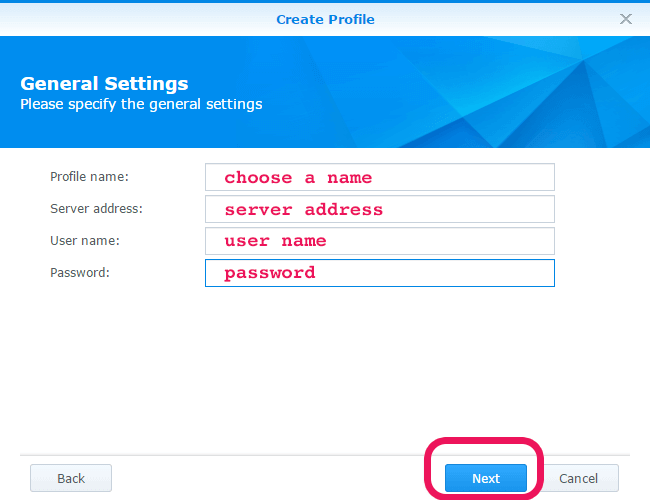
Enter Your Details
- Here you’ll see the Advanced Settings screen, where you’ll need to enter: Authentication: MS CHAP v2 & Encryption: Maximum MPPE (128 bit). Check both boxes to “Use default gateway on remote network”, and “Reconnect when the VPN connection is lost”. Click Apply when done.
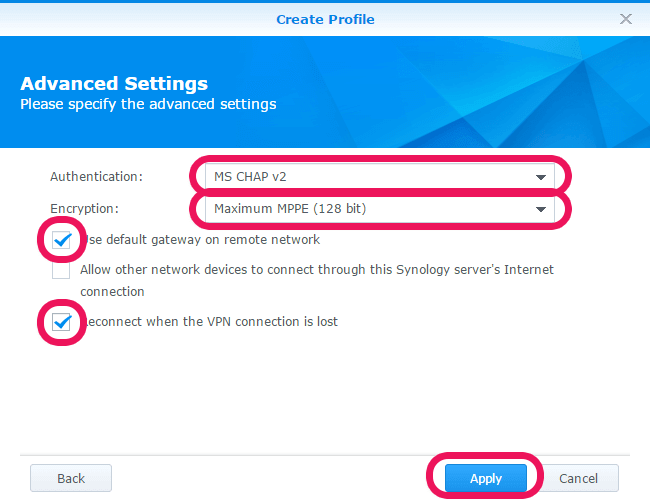
Configure Advanced Settings
Launch the Connection to the VPN Server on Synology
You’ll be able to see your new VPN profile in the Network Interface window. Click on it, and press Connect.
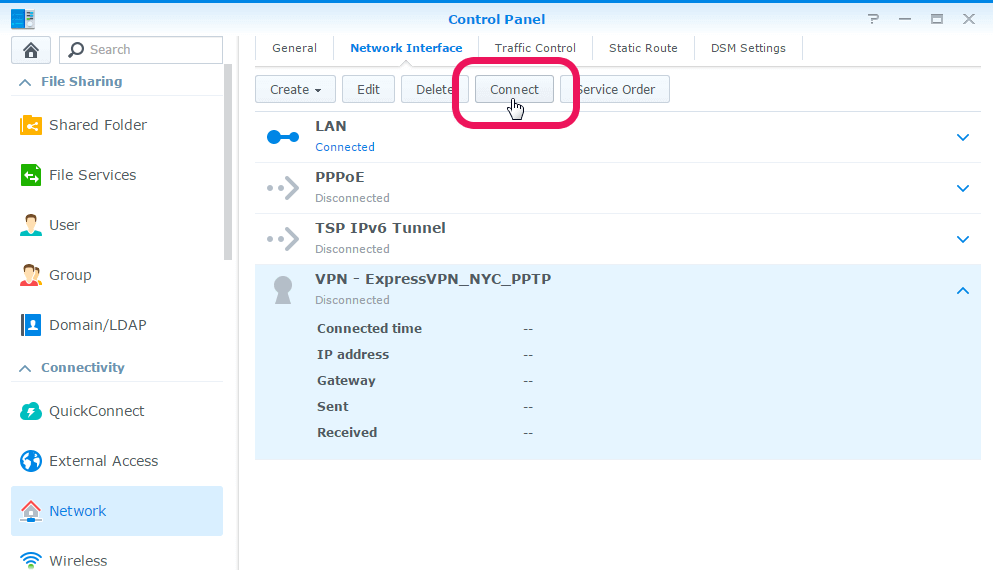
Launch the VPN Connection on Synology
Disconnecting from the VPN server on Synology
For whatever reason, you might want to discontinue your connection to your VPN server. To do this, go through Control Panel > Network > Network Interface and click your VPN profile. Press Disconnect.
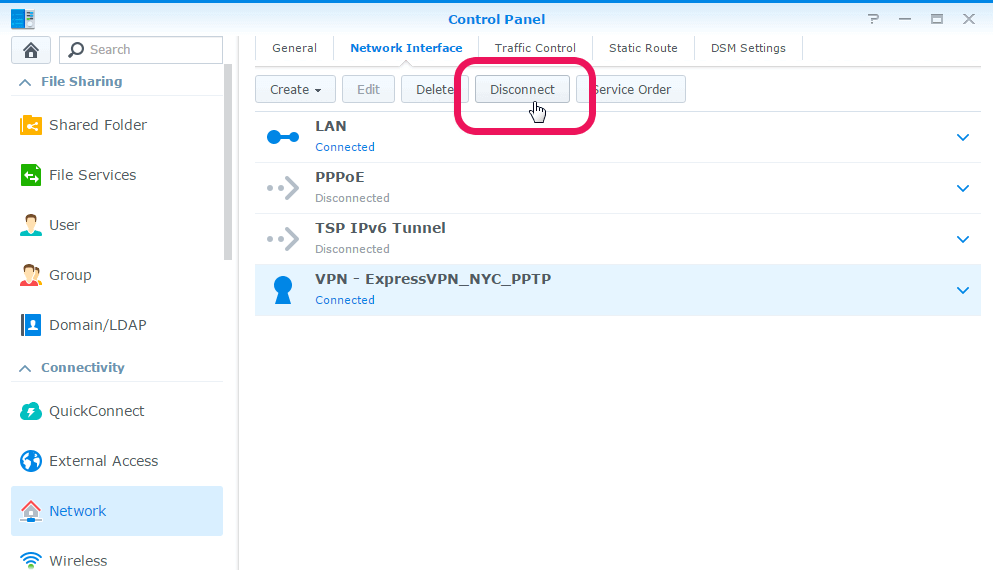
Disconnect VPN Connection on Synology
How to Setup VPN on Synology NAS – Wrap Up
Hopefully the tutorial above provided you with clear instruction on how to install VPN on Synology. Just in case you have further inquiries or need help completing the setup process, feel free to leave a comment below.




this is the part I have difficulty with: what do in fill in: is it an already existing part of my NAS Synology DS 918, because it needs to interact toghetrer to make the ExpressVPN work with each other with my NAS in one inviroment.
is there an easy manual that explains the step by step.?
Primarily the first part of the questions is for me the most important.
many thanks ,
with regards,
Theo
I tried to connect my NAS Synology DS413j to your VPN server, but downloading torrents is not possible because the search function returns “no match found”
The settings are as follows:
server address: nl1-ubuntu-l2tp.expressprovider.com
user name: fgfkh5
password: unreadable
authentication: MS CHAP v2
encryption: Maximum MPPE (128 bit)
checked: Use default gateway on remote network
checked: Reconnect when the VPN connection is lost
What should I do to make it working?
Also having the same issue as Kees Kramer. Any help would be appreciated.