How to Configure DNS Settings on DD-WRT Routers
If you own a DD-WRT router, you probably know that you can unlock your router’s full potential. I’m talking about installing a VPN on your DD-WRT router and so many more things you can do now. Well, full potential is not achieved unless you know how to change DNS settings as well. Don’t worry, this guide below will show you exactly how to do so.
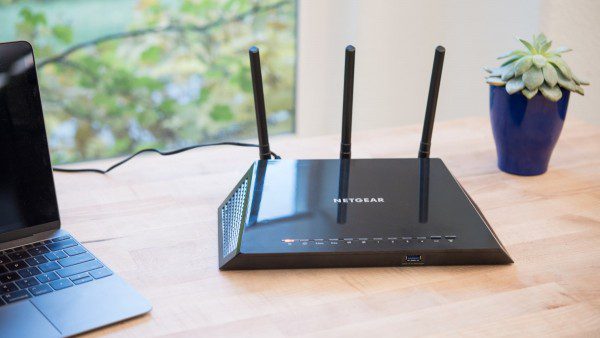
How to Change DNS Settings on DD-WRT Routers
DD-WRT Routers and DNS
A DD-WRT router is a router that has had special firmware called DD-WRT installed on it. DD-WRT is a Linux based alternative OpenSource firmware suitable for a great variety of WLAN routers to enhance their performance and features. First, it’s so much different than the router your ISP gives you when you purchase a broadband contract. Second, when you have DD-WRT on your router, you’ll get to enhance your wireless router’s stability, privacy, and most importantly, your network security. You can even easily install a Virtual Private Network on your router once it’s labeled as DD-WRT.
Flashing a router with DD-WRT can be pretty daunting. That’s why most people who don’t have the technical knowledge just buy a pre-flashed one.
Now, to get to the DNS part. Short for Domain Name System, DNS is the phonebook of the internet. When you enter a specific website in your browser, the words you typed before pressing the “Enter” button get directed to a DNS server. Once there, they get translated to IP address and sent back to your browser in order for the page to load. You see computers don’t understand the language we say, they operate on digits which we call IPs. That’s what happens behind the scenes every time you try to access a webpage. Moreover, changing your DNS on any device can be very beneficial when it comes to using the internet. Before I tell you how to do so, take a look at the top best DNS servers that you can use:
- Google
- 8.8.8.8
- 8.8.4.4
- OpenDNS:
- 208.67.222.222
- 208.67.220.220
Step 1: Obtain Your Router’s IP Address
Ok, so if you checked how to flash your router with DD-WRT, you’re probably a bit woozy right now. Don’t worry, once you’re done with that or you already have a flashed one, the process doesn’t get any easier. Changing DNS on your router is a simple task. All you have to do is follow the steps below depending on your approach.
First, you need to get your router’s IP in order to access its DNS settings. I’ve given you a walkthrough on both PC and Mac. Check them out and follow the steps according to which device you’re using.
Get Your Router’s IP on MacOS
On a Macintosh, the process should take a couple of minutes only. No technical skills are required, take a look:
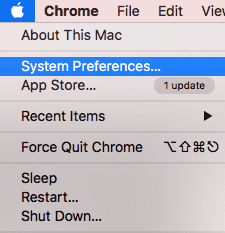
- On your Mac, tap on the Apple sign on the top left corner of your screen.
- Select System Preferences.
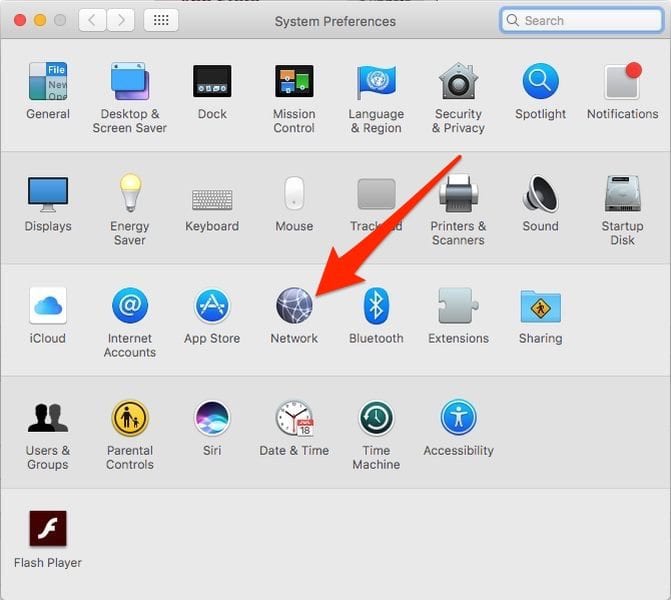
- Head over to Network.
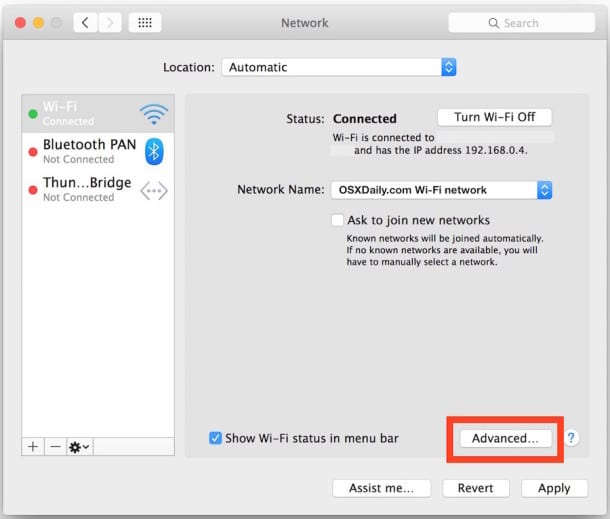
- Now, click on Advanced.
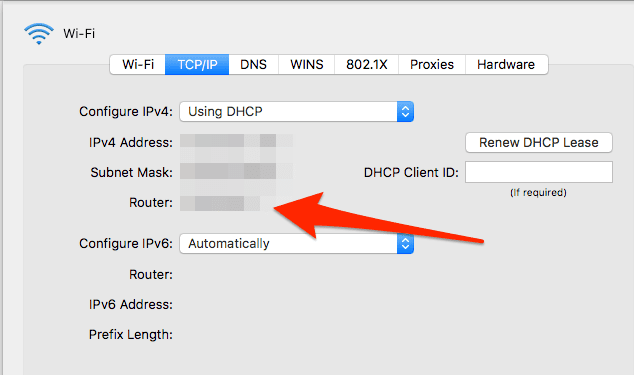
- Select TCP/IP. Your router’s IP should be where the arrow is pointing.
Obtain Router’s IP on Windows PC
Getting your router’s IP on a Windows PC is a bit harder than on Mac. You need to enter a few things here and there before getting to know the IP address. Don’t worry, I’ll guide you through it. Follow the steps below:
- On your laptop, head over to “Command Prompt”.
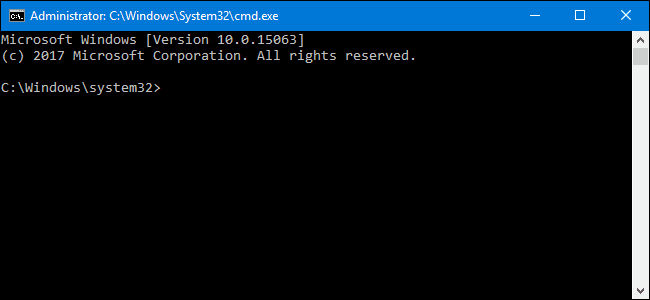
- Type the following: “ipconfig”. Don’t use quotations.
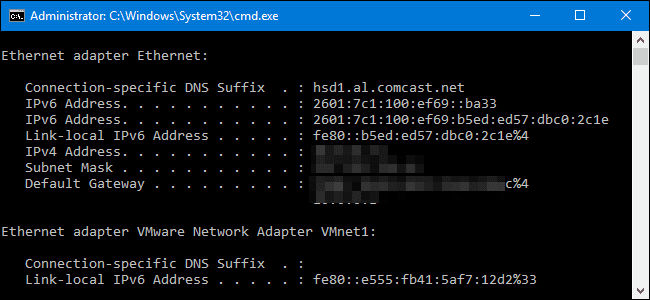
- You’ll see your network’s information presented in front of you.
- Your router’s IP should be next to Default Gateway.
Step 2: Change DNS on Your DD-WRT Router
Now that you have your router’s IP address, you can change the DNS settings easily. The steps you’re about to follow are pretty easy, so don’t fret about not understanding what you’re about to see. You don’t need to be tech-savvy to pull this off. Let’s do it, shall we?
- Open whatever browser you feel comfortable while using.
- Go to your router’s settings page. You can do so by typing in the router’s IP you just got in the browser’s address bar.
- You’ll be asked to sign in with your credentials. Type in the username and password. If they’re still on default, it’s mostly “admin”.
- This will take you to your DD-WRT router’s home page.
- Once there, press on Setup then Basic Setup.
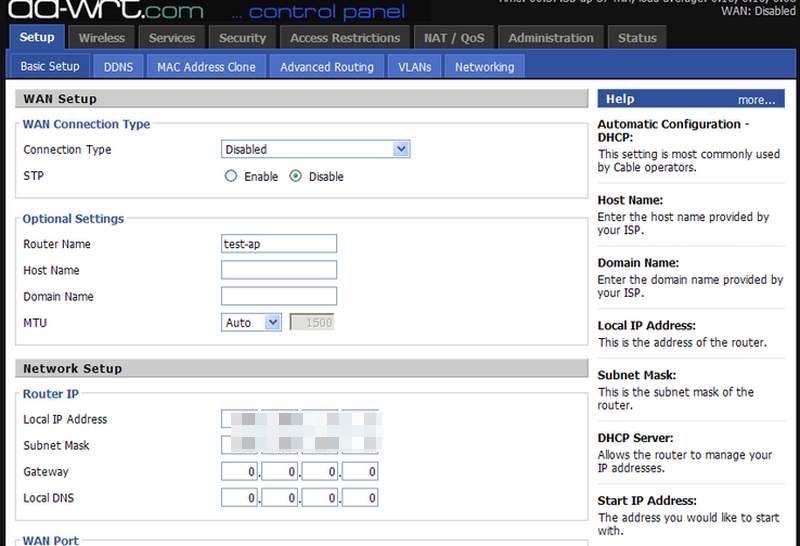
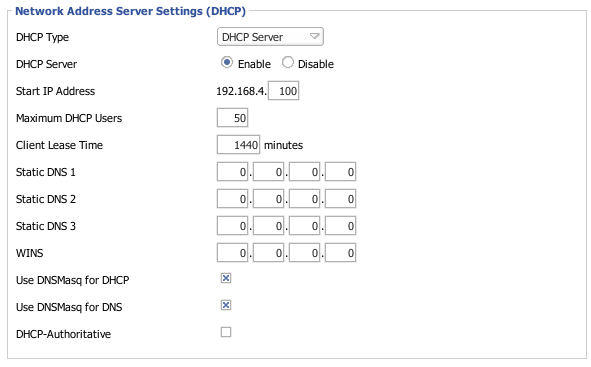
- Now, scroll down the page and you will see the Network Address Server Settings area.
- There are three fields titled Static DNS 1 and Static DNS 2.
- Enter your preferred DNS servers.
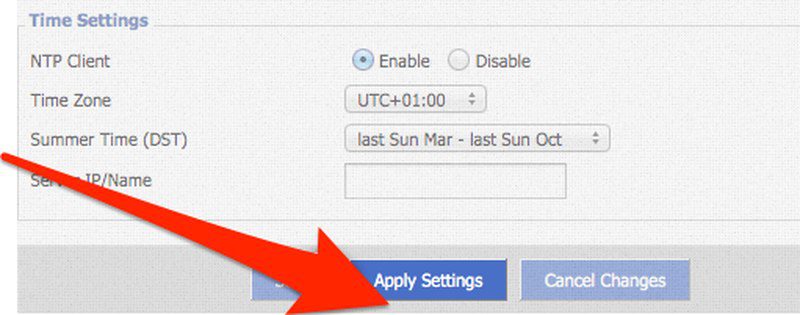
- Finally, scroll down and Click “Apply Settings”.
- You’re done. You’ve successfully changed DNS servers on your DD-WRT router.
Top 5 DD-WRT Routers
If you don’t know your way around DD-WRT routers, I’ve picked the top ones that you can get in order to elevate your internet experience. Check them out below:
- Netgear R7000
- Linksys WRT3200ACM
- Asus RT-AC5300
- Asus RT-AC56U
- Linksys WRT1200AC
- Netgear R9000
Why Change DNS Servers on DD-WRT Routers
You get a lot of benefits from changing your DNS settings on your router. When you subscribe to any internet service, your ISP automatically assigns you with several settings, including the DNS server you use when you access the internet. However, if an ISP doesn’t invest much on its servers, you might run into some issues particularly speed. Let’s take a look at what manually configuring DNS may benefit you in the future.
Connection Speed
Have you ever witnessed a sudden drop in your internet connection? You all know it and say it when that happens: “There’s an overload”. Yeah, your ISP’s servers can get easily overloaded especially if there aren’t many ISPs in your country. When you change your DNS server, you might end up connecting to one where no peak hours exist.
For example, imagine you connect to a DNS server where nighttime is peak time in your country? This means that everyone in that region is asleep and you get to roam the internet freely without having any latency issues. That’s in the technical world. However, in the real one, you won’t notice much difference, but your webpage will load a lot faster than when you were operating on your ISP’s servers.
Access Geo-restricted Content
Now, this cannot be done by changing the DNS server alone. You’ll have to invest in a Smart DNS proxy service to pull it off. You might want me to clear things out first. Streaming channels are available all around the world, yet restricted to there own region. In other words, streaming services will only allow certain content in specific countries. The most common way to enforce those restrictions is to examine the viewer’s IP address and attempt to determine the exact location.
Smart DNS is the merge of DNS servers and tactically located proxies. It rechannels part of your internet traffic that helps trick the channel into thinking that you’re accessing its website from within its country. As a result, you’ll have full access to the channel’s content despite being physically outside its area of coverage. Now, not all Smart DNS services are up for the task. That’s why I went ahead and review 3 of the top Smart DNS services out there. Note that 2 of them are pure VPN providers. Here they are:
ExpressVPN
ExpressVPN is one of the biggest VPN providers in the world. They offer great diversity in terms of the geography of their servers. We’re talking about more than 2000 servers in 94 countries. Moreover, the VPN has a simple and user-friendly interface. You don’t have to be that technically aware to operate with their clients no matter what platform you’re using.
As for its MediaStreamer, it’s well-known to unblock hundreds of channels without a setback. They provide you with all the information you need to set up their Smart DNS service on your device. Don’t worry, they got your back. If you don’t like their service (I doubt that), you can ask for a refund if a 30-day period hasn’t passed.
BulletVPN
BulletVPN, based in Estonia, is certainly pretty fast when you speak of speed. Whether unblocking geo-restricted services like Netflix or bypassing government-controlled filters, this VPN can do it all with ease. BulletVPN has 154 servers in 55 countries, which is excellent for unblocking geo-restricted content.
However, we’re talking about Smart DNS Proxy and this VPN provider has one heck of a service. Dozens of channels can be within your grasp if you choose to invest in BulletVPN.
Surfshark
This VPN is another great option to choose if you own a DD-WRT router. First, you get to set it up and access servers across 65 countries. This will ensure your ability to unblock geo-restricted content from all over the world.
Aside from that, Surfshark also has a Smart DNS service. When you configure it on your router, no encryption would be present. However, you’ll be able to stream your content with limited to no speed loss.
Unlocator
Unlocator offers a Smart DNS service like no other if you’re looking to unlock streaming channels. The Danish company offers a 7-day trial which doesn’t include having to provide your credit card information.
You will find that the service offers a speedy way of unblocking media services which include more than 233 channels around the world. I’m talking about the likes of Hulu, Netflix, ABC, Disney Movies Anywhere, ESPN, Sky, and Spotify. Check out their website for the full list of supported services. If you like their service, you can follow the setup guides offered on the webpage to help you out with the configuration.
Is It Safe Though?
It’s not that they’re not safe, they just don’t add anything extra to your connection. Smart DNS is a tool to bypass regional restrictions, period. If you’re looking for extra security, a VPN is the way to go.
VPNs provide superior privacy over proxies because VPNs encrypt traffic and hide your real IP address. The protection part goes to VPNs only. No matter how secure the server you’re using with Smart DNS is, you’re not getting the extra layer of protection that we all need when we access the internet. It is much harder or next to impossible for your ISP to see what you’re doing inside an encrypted VPN tunnel.
So, if you’re a security freak who’s well aware of the dangers of the internet nowadays, I suggest you use a VPN instead. If you’re here for streaming only, Smart DNS is your best bet as no drop in connection occurs since you won’t be encrypting your data. To help you out more in your search for the best VPN for DD-WRT routers, check the table below.

- Best for streaming and privacy
- High speed servers in 160 VPN locations
- Works for Netflix, BBC iPlayer, Amazon Prime Video, and Hulu
- 24/7/ live chat support
- 3 extra months free on annual plan

- UltraHD streaming
- Free Smart DNS proxy
- Unblocks all major streaming services
- Limited Time 72% Discount

- Unlimited VPN connections
- Over 1000 servers
- Ad-blocking feature available
- User-friendly application
- Exclusive Smart VPN feature
- Standalone Smart DNS subscription available
- Extra security features
- Extensions for Firefox and Chrome
- Split-tunneling available
How to Configure DNS on DD-WRT Routers – Final Thoughts
There you have it. Now, you can break free from what your ISP imposed on you the moment you said “I Agree” and “Connect”. DD-WRT routers are very helpful when it comes to installing software without having to go through the annoying technical stuff. Change your DNS settings and enjoy a completely different internet experience from now on.


iptables -I FORWARD –destination 8.8.8.8 -j REJECT
iptables -I FORWARD –destination 8.8.4.4 -j REJECT