
How to Change DNS Settings on Apple TV
Slow connection speeds will ruin your Apple TV experience. I’ve tried a lot of different fixes to solve the issue. However, some of them worked for a short period of time, but none of them seemed to stick. With a bit of research, what worked for me was changing my DNS settings on my Apple TV. So, if you’re facing the same problem, here’s how to configure DNS on Apple TV.
How to Change DNS on Apple TV
How to Change DNS on Your Apple TV
Normal web surfers remember the name of a website and type it in for access. However, your own computer doesn’t work that way. It doesn’t understand what you’re writing and that’s where DNS comes in. The service translates the name you enter to an IP address, which is basically the language of internet browsers.
First things first, I suggest you write down your current server addresses or settings aside. It is very important that you keep these numbers in case you need to revert to them in the near future.
Before we begin, here are notable DNS servers that you can use
- (Note that Apple TV works differently. If you are entering Google DNS, then on Apple TV you will have to enter “008.008.008.008”. 0 is used as a prefix:
- Google DNS: Google offers free DNS service, which is fast as well as reliable:
- 8.8.8.8
- 8.8.4.4
- OpenDNS: OpenDNS is one more fast and reliable DNS server, you can choose either of the following addresses:
- 208.67.222.222
- 208.67.222.220
Now, with that out of the way, here’s how you configure DNS on your Apple TV:
How to Configure DNS on Apple TV 4
These are the steps needed to change your Apple TV 4’s DNS settings:
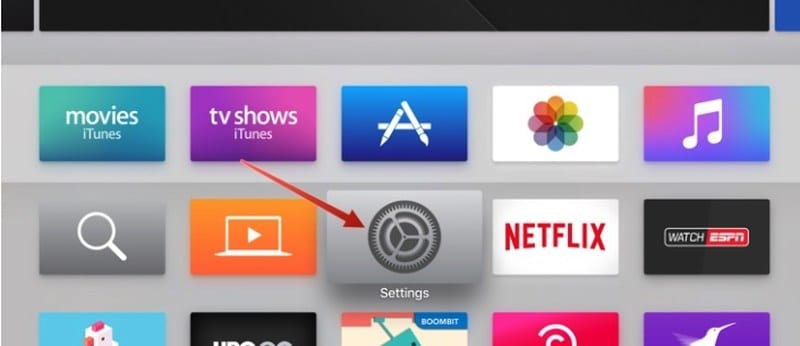
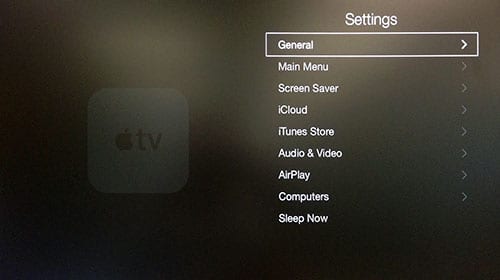
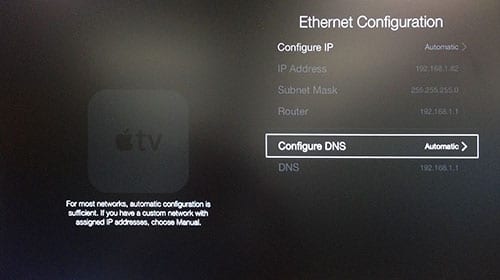
- From the Apple TV Main menu, click on Settings.
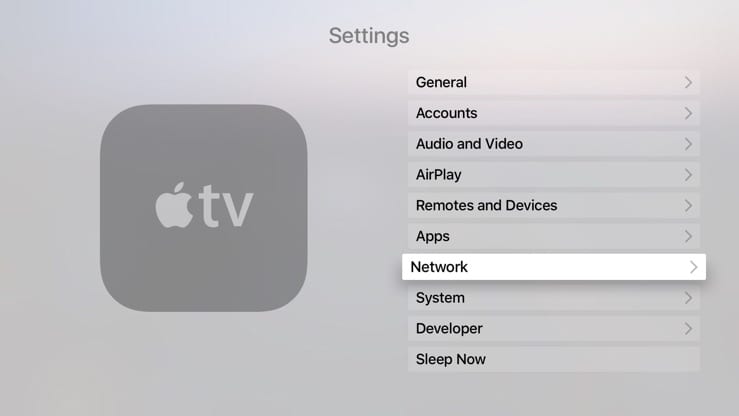
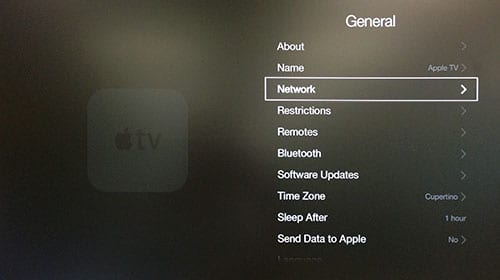
- Click on Network.
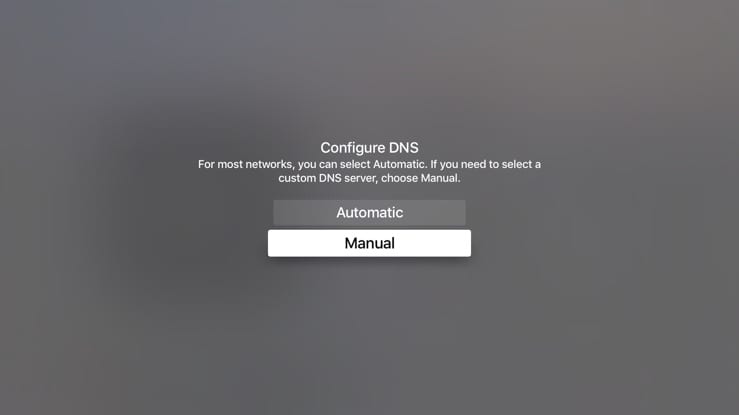
- Whether you’re using Wi-Fi or Ethernet, click on Configure DNS.
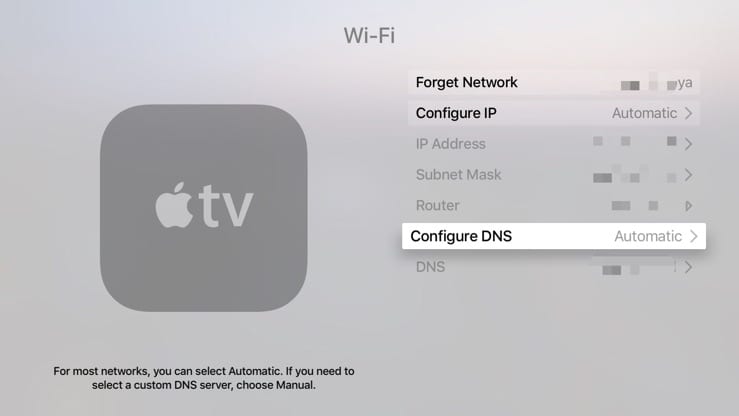
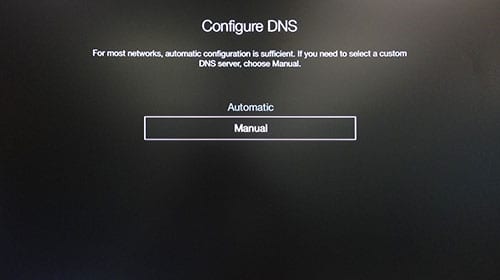
- Select Manual.
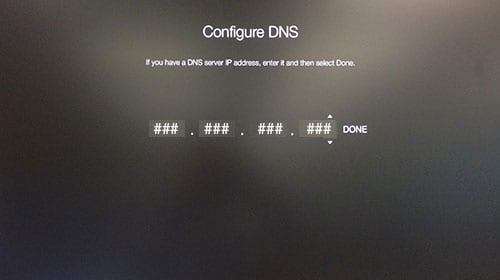
- Enter your DNS.
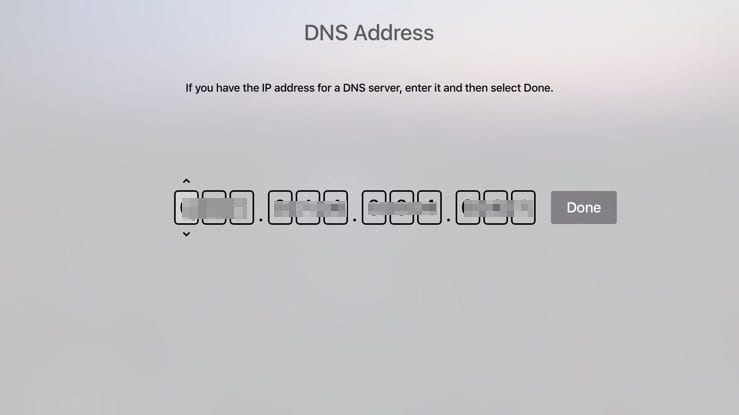
- Once your DNS is entered, hit Done.
- Restart your device.
Change DNS Settings on Apple TV’s Older Generations
The process here is as simple as it is on the 4th Generation of Apple TV. Here’s how you configure DNS on the older versions such as Apple TV 3:
- Go to Settings > General.
- Choose Network.
- Select Wi-Fi or Ethernet (Depending on which one you’re using).

- Click on Configure DNS.
- Hit Manual.
- Now Enter the DNS you’re using.
Why Change Your Apple TV’s DNS Settings?
Whenever you face some slight drops in your internet, you start blaming your ISP. Am I right? Well, for someone as tech-savvy as I am, you’d look for alternatives that would get your brains to function a bit more. However, if you’ve seen my tutorials before, I’ve already covered DNS changing on Mac. Today, you’re learning how to do so on Apple TV. But the real question is why? Here’s your answer.
Improve Connection Speed
Your ISP’s servers are not considered to be that reliable when it comes to fast speeds. They always throttle the connection and you suffer a lot when you’re at peak times. Ever wondered why an episode is not loading properly? Well, you’re not the only one watching at the moment. The server you’re using might be overloaded, hence that drastic drop in connection.
If you change your DNS, you’ll probably land a less trafficked server in which you can use for better streaming speeds. It’s really quite helpful when you use Apple TV as streaming is the main essence of the platform.
Bypass Regional Restrictions
By changing your DNS, you get to unblock geo-restricted content unavailable in your country. In other words, you can access the likes of American Netflix, Hulu, and so many more regardless of where you might be.
Tapping into international streaming material is an easy job once you get to know your way around it. All you have to do is change your Apple TV’s region so that you’ll be able to download the desired application. After that, you need to invest in a Smart DNS service to reroute your traffic to the app’s country. For example, services like ExpressVPN, BulletVPN, and Unlocator offer Smart DNS for customers.
By using that, you’ll change the URLs responsible for showing your current location. Once configured on your Apple TV, you’ll spoof your online location and appear in a different country. The region that supports the use of the desired channel. Take American Netflix for example, Smart DNS will help you relocate to the United States. As a result, all geo-restricted material in America will be at your disposal.
Is It Safe To Change DNS on Apple TV?
When we mention privacy, switching DNS servers won’t really stop your ISP from monitoring what sites you visit. However, this might limit what information they might gather on you.
Additionally, using the wrong DNS on your Apple TV might result in a loss of Internet connection. We also advise you to never use DNS server addresses unless you are absolutely certain about who operates them.
To really hide your browsing activities, you need a VPN so that your data gets encrypted. So, in other words, changing your DNS is not safe and using a Smart DNS service only bypasses regional restrictions, not more.
You can choose a VPN provider in the table below if you’re one of those safety seekers.


- Best for streaming and privacy
- High speed servers in 160 VPN locations
- Works for Netflix, BBC iPlayer, Amazon Prime Video, and Hulu
- 24/7/ live chat support
- 3 extra months free on annual plan


- UltraHD streaming
- Free Smart DNS proxy
- Unblocks all major streaming services
- Limited Time 72% Discount


- Unlimited VPN connections
- Over 1000 servers
- Ad-blocking feature available

- User-friendly application
- Exclusive Smart VPN feature
- Standalone Smart DNS subscription available
- Extra security features
- Extensions for Firefox and Chrome
- Split-tunneling available
Top Providers with Smart DNS Feature
Here are the top providers that offer Smart DNS service:
ExpressVPN
ExpressVPN stands tall as one of the best possible services you could ever subscribe to. The award-winning provider has been around for over a decade now. It has a network of close to 2000 servers around the world. The service also allows its users to have up to 3 simultaneous connections and provides MediaStreamer, its own Smart DNS service.
This VPN also offers the best customer care in the industry, with a team that’s always available 24/7 to be contacted through email, social media, or live chat messages on its site.
BulletVPN
BulletVPN grants users the ability to pertain to today’s internet censorship and all the tracks the government keeps of its citizens. A VPN such as this is a necessity in today’s terms. Moreover, this VPN doesn’t only protect your privacy, it also offers a Smart DNS service like no other. So, basically, when you’re operating an Apple TV, BulletVPN is a good choice.
Surfshark
Surfshark is an easy VPN to set up on your router. It offers military-grade encryption and helps you anonymize your internet approach. With servers in 65 countries to choose from, you get to access any channel you can get on your Apple TV.
Aside from that, it has a Smart DNS feature you get for free when you subscribe. All you have to do is configure it on the device and you’ll be watching geo-blocked services wherever you are.
Unlocator
The company provides Custom Computer Programming Services and released its SmartDNS service in 2013 to cater to the accessibility and unblocking needs of netizens around the world. Not long ago, their service expanded to include VPN. But we all know Unlocator was and will always be one of the best Smart DNS clients in the world. So, if you’re looking for an awesome Apple TV experience, invest in Unlocator.
NordVPN
The last VPN for Apple TV would be NordVPN. It’s a great server for security, privacy, and of course, unblocking streaming channels on any device out there.
It also has SmartPlay, its own Smart DNS that could be directly set up on your Apple TV. NordVPN has a 30-day refund policy in case it did not live up to your expectations.
Change Apple TV’s DNS Settings – Final Words
If you ever experience slow streaming performance and downloads, changing the DNS settings can sometimes help alleviate the problem. You now know everything that has to do with changing your DNS on Apple TV. I’ve done my part, it’s your turn now. Enjoy Apple TV to the max.
Related Posts


About The Author
Charles
Streaming gadgets geek. Interested in every little thing there is to know about bypassing regional restrictions. An avid believer in the right to protect online privacy. Charles has also reviewed plenty of VPN service providers and knows how to separate the good apples from the bad ones.
